|
ROCHESTER CARBURETORS Bulletin 9D-8 August, 1951 |
|||||
|
Bulletin 9D-8
August, 1951
Model "BC"
Page 13 |
|||||
|
|
|||||
|
ROCHESTER PRODUCTS, DIVISION OF GENERAL MOTORS, ROCHESTER. NEW
YORK |
|||||
|
|
|||||
|
7. Attach air horn to bowl with
attaching screws. Tighten
screws evenly and securely.
8. Install filter screen, strainer nut and
gasket assembly in air
horn. |
 |
||||
|
9. |
Place new gasket into position
and attach choke housing to air horn.
Tighten screws securely.
Place new hex fitting packing on
choke suction tube and tighten fitting on choke housing. Fitting must be
tight to prevent loss of vacuum.
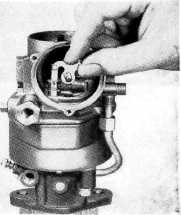
Assemble choke piston to shaft
with pin and place into choke housing bore as shown in Figure 10. Rotate
choke shaft counter-clockwise so that piston rides in housing
cavity.
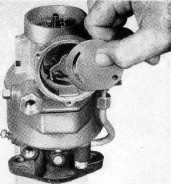
Install choke valve on choke
shaft with letters "RP" facing
upward. Center choke valve before tightening screws. Place baffle
plate and choke cover gasket into position as shown in Figure 11, and
install choke coil and cover. Rotate cover clockwise until index marks on
cover and housing are aligned. |
||||
|
10. |
|||||
|
11. |
|||||
|
Figure 10 |
|||||
|
12. |
 |
||||
|
13. |
Attach three retainers and screws
choke housing and tighten securely. |
to |
|||
|
NOTE: Choke valve should be
lightly closed at room temperature (75°F) when index mark on cover and
housing are aligned.
Place choke counterweight on end
of choke shaft with tang facing choke housing. Install spacing washer and trip
lever so that tang of trip lever is atop counterweight tang, when
choke valve is full open as shown in Figure 12. |
|||||
|
14. |
 |
||||
|
Figure 11 |
|||||
|
|
|||||