1942 - 1947 CHEVROLET SHOP MANUAL
Section 4 - Rear Axle, Universal Joints & Springs
|
|
||||
|
4-4 |
||||
|
|
||||
|
the leather oil seal, and that
they engage with the splines of the
differential side gears. Replace the "C" washers on the inner end of the shafts
and pry the shaft ends apart
carefully (do not scratch or damage inner ends) so that the "C" washers
are seated in the counterbore
in the differential side gears.
Select the
proper axle shaft spacer so that there is from a free fit to a maximum of .014"
clearance between the ends of
the axle shafts and the spacer, Fig. 5.
NOTE—There are four sizes of
axle shaft spacers available for use on the rear axle, their
dimensions being as follows: |
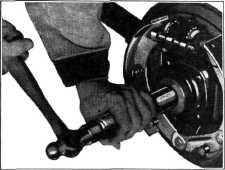
described
and insert the special bearing puller shown in Fig. 6. This puller should be
assembled into the bearing and
the axle housing with the jaws of the puller in a vertical position
so as to keep them away from the
welding flash on the inside of the axle housing. This tool not only
removes the bearing but
the bearing retainer on the inside and the leather oil seal on the
outside.
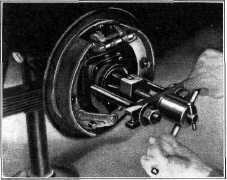
To Replace Axle Shaft Bearing
To replace
a new bearing and leather oil seal in
the axle housing, the special tool shown in Fig. 7 can be used to locate the bearing in its
correct position.
With the bearing and inside
bearing retainer and the outside leather oil seal assembled to the end of
the driver, start the bearing into the
axle housing. A few light blows with a hammer on the end of the
tool will seat the bearing in its
correct position as well as the retainer and the oil seal. After the tool
has been removed, the oil seal should be staked in place with a prick
punch.
Assemble
the axle shafts and wheels as previously
described. |
|||
|
Narrow-1.0105"
Medium-(1.0195"
Medium
(1.0295"
Wide-1.0345" |
Wide Across Ground Surfaces
Wide Across Ground Surfaces Wide Across Ground Surfaces Wide Across Ground
Surfaces |
|||
|
You will
note in the Master Parts Book that only one part number is listed for the two
medium size spacers. This is
because all four surfaces of the medium spacer are ground, while the narrow
spacer and wide spacer have
only two surfaces ground.
After the
proper clearance is obtained between the axle shaft end and the spacer and it is
properly installed in its
place, assemble the pinion shaft and lock it in place with the special screw,
using a lockwasher under its
head.
Replace the axle housing cover,
using a new cork gasket, and fill the differential to proper level with
the correct hypoid gear
lubricant. |
||||
 |
||||
 |
||||
|
Fig. 7—Axle Shaft Bearing and Retainer Replacer
MAJOR SERVICE OPERATIONS
Removing Rear Axle Assembly
Raise the
car from the floor by the use of jacks and car horses, or by the use of a chain
hoist and a lifting device. Remove both rear wheels and brake drums. Install wheel cylinder clamps on the
brake wheel cylinders.
Disconnect the hand brake cables from the idler lever, and remove the brake
cables from the cable clamps
on the frame. Disconnect the
hydraulic brake line connection at the rear axle housing. Disconnect the shock absorber
links from the anchor plates.
Remove the spring "U" bolts; disconnect the spring shackles and drop the
springs. Slide the axle back
to disconnect the torque tube at the front end. The axle is now
free and can be moved to the axle
stand. |
||||
|
Fig. 6-- Shaft Bearing Puller
To Remove Axle Shaft Bearing
The wheel end of the axle shaft is
mounted in a Hyatt roller bearing which is pressed into the axle housing.
To remove this bearing it is necessary to remove the wheels and axle shafts as
previously |
||||
|
|
||||