1942 - 1947 CHEVROLET SHOP MANUAL
Section 4 - Rear Axle, Universal Joints & Springs
|
|
|||
|
4-23 |
|||
|
|
|||
|
the left bearing, at the same time
fitting the shifter yoke to the groove in the shifter sleeve.
Install
the double reduction shaft bearing outer race in the right side of the carrier and
tap it in flush with the
carrier.
Install a
new gasket on each side, and then install the same number and thickness of shims
that were removed when
disassembling, making sure the
cut-out in the gasket and shims line up with the lubrication openings in the housing,
Fig. 46.
Assemble
the bearing caps, being careful to line up the lubrication openings in the cap with
those in the carrier. Install three lockwashers and nuts on each cap, evenly spaced, and tighten
them securely.
Install
the shifter yoke shaft bushing over the shaft and tap it into the carrier. Then
install the cork seal in the top of the bushing. Assemble
the |
 |
||
 |
|||
|
Fig. 47-Pinion Cage Oil Holes
first in
one direction and then the other, at the same time applying pressure on
the back of the ring gear to bring a
load on the gears.
Then check
the tooth bearing on the ring gear for
pinion depth. If the pinion is too deep the tooth bearing will be below the pitch line.
If it is too shallow, the
bearing will be above the pitch line.
To make
pinion depth adjustment, remove the pinion cage and—
1. Add shims between cage and carrier if the
pinion is too
deep.
2. Remove shims if the pinion is too shallow.
Excessive backlash between the
ring gear and |
|||
|
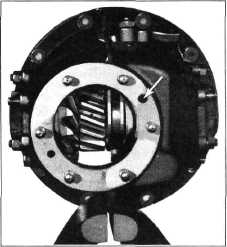
Fig, 46—Installing Double Reduction Shaft Bearing Cap
Shims
shift lock
spring and pawl. Install the Woodruff key in the shaft, shift lever, shakeproof
lockwasher and nut Tighten the
nut securely.
Check the
bearing adjustment. Correct adjustment of the double reduction shaft bearings
will produce a slight "drag"
when it is turned by hand. Bearing adjustment is secured by the use
of shims of .003" and .005"
thickness.
Assemble a new pinion cage gasket
and the same number and thickness of shims that were removed when disassembling. Be careful to line up
the oil holes.
Assemble pinion cage and pinion
assembly to the carrier with the
lubrication fitting in the cage to the top right side, being careful to line
up the oil holes, Fig. 47.
Install three lockwashers and nuts evenly spaced and tighten them
securely.
Adjustment
Paint the
ring gear with red lead, or coat it lightly with prussian blue. Turn the drive
pinion |
|||
 |
|||
|
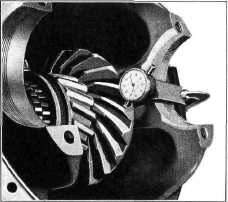
Fig. 48—Checking Backlash |
|||
|
|
|||