1942 - 1947 CHEVROLET SHOP MANUAL
Section 6 - Engine
|
|
||||
|
6-53 |
||||
|
|
||||
|
Tighten all manifold bolts, valve
rocker shaft support bolts and nuts.
Valve stems should be lubricated
with light engine oil to make sure they are not sticking—this is
important.
Intake valve clearance should be
adjusted to a minimum of .006" to a maximum of .008" hot.
Exhaust valve clearance should be
adjusted to a minimum of .013" to a maximum of .015" hot.
Regular attention will practically
eliminate cooling system troubles. The most logical times for
cleaning and reconditioning the cooling system are:
1. When anti-freeze is installed in the
fall.
2. When anti-freeze is removed in the
spring.
CLUTCH
CONSTRUCTION
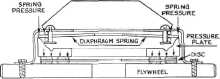
The clutch on all passenger car
and trucks is the single plate dry disc type, designed around a diaphragm
spring having the shape of a dished |
engaged, the fingers are flat and
the entire rim of the diaphragm spring exerts pressure against
the |
|||
|
SPRING PIVOTS ON THIS PIVOT
RING |
||||
 |
||||
|
Fig. 110—Engaged Position of
Diaphragm Spring
pressure plate, Fig. 110. When the
clutch pedal is depressed, pressure of the throwout bearing on the inner
ends of the fingers causes a diaphragm action and the outer ends of the
fingers, near the rim, pivot on the inner pivot ring. Fig. 111. This
action |
||||
|
THROWOUT BEARING FORCES SPRING IN
THIS DIRECTION |
||||
 |
||||
 |
||||
|
Fig. 111—Disengaged Position of Diaphragm Spring
causes the rim of the spring and
the pressure plate to move back away from the clutch disc,
disengaging the clutch. When the clutch pedal is released and the
throwout bearing no longer contacts the fingers, the "spring" in this
material causes the fingers to pivot about the rear pivot ring and the rim
to bear against the pressure plate.
Clutch Noises
A rattling noise in the clutch
assembly at idling speed with the clutch released may be caused by
insufficient tension on the pressure plate retracting springs. This noise
can be easily remedied by replacing the retracting springs as
follows:
1. Remove the clutch housing
under-pan.
2. Hand-crank the engine until one retracting
spring attaching bolt is at the
bottom. Remove the bolt and
retracting spring and install a new spring.
3. Replace the other retracting springs in the
same manner as described
above.
Should the above not correct the
rattle, the clearance between the drive lugs on the pressure plate and the
slots in the clutch cover should be checked. If this clearance exceeds
.010", the pressure plate and/or cover assembly should be
replaced, to obtain proper clearance. |
||||
|
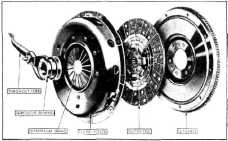
Fig. 108—Layout of Clutch Parts
washer with eighteen tapering
fingers pointing inward. Fig. 108. The
 |
||||
|
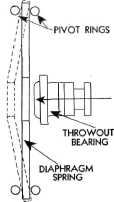
spring is made from very high
quality steel, carefully heat-treated and shot-blasted to assure long
life. The action of the diaphragm spring may be compared to the flexing action of the bottom of
an ordinary oil can. By depressing the clutch pedal, the throwout bearing is forced against
the diaphragm spring fingers, causing the diaphragm spring to pivot
on the pivot rings, Fig. 109 When the clutch is |
Fig. 109—Action of Diaphragm Spring |
|||
|
|
||||