1942 - 1947 CHEVROLET SHOP MANUAL
Section 9 - Steering Gear Assembly
|
|
|||
|
9-11 |
|||
|
|
|||
|
Worn
sector shaft bushings may be removed and replaced with special driver J-1614 on
conventional models, and with J-1615 on Cab-Over-Engine models, Fig. 20. The bushings are
machined to permit pressing
them into the housing without reaming.
Inspect the
fit of the pilot on the end of the sector shaft in its bushing in the side
cover. If this bushing is
worn, a new side cover and bushing assembly should be installed as it is not
practical to replace this
bushing in the Service Department.
Check the
ball guides for any damage at the ends
where they deflect or pick the balls from their helical path. Any damaged guides should be
replaced.
Reassembly of Ball Nut
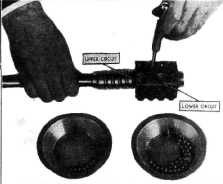
1. Place
the wormshaft flat on the bench and slip the nut over the worm with the ball guide
holes UP, Fig. 21. Align the
grooves in the worm and nut by
sighting through the bottom of
the ball guide holes. |
few turns. The filling of the
circuit can then be continued. It may be necessary to work the worm back
and forth, holding the balls down first in one hole then the other, to
close up the spaces between the balls and fill the circuit completely and
solidly.
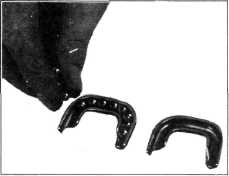
3. Lay one
half of a guide, groove UP, on the bench and place the remaining balls from
the count container in it,
Fig. 22. The number of balls remaining should just fill the
guide. |
||
 |
|||
 |
|||
|
Fig. 22-Filling Ball Guides
4. Close this half of the guide with the other
half. Hold the two halves
together and plug each open end
with clear vaseline or heavy grease so the balls will drop
out.
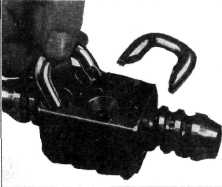
5. Push the guide into the guide holes of the
nut as shown in Fig. 23. This completes one circuit of balls. If the guide does not push
all the way down easily, tap it lightly into place with the wooden handle of a screw
driver. |
|||
 |
|||
|
Fig. 21—Filling Ball Circuits In Nut
2. Count 30
balls (53 on C.O.E. models) into a suitable container. This is the proper
number of balls for one
circuit. Drop the counted balls from the container into one of the guide
holes while turning the worm
gradually away from that hole.
Continue until the ball circuit is full from the bottom of one guide hole to
the bottom of the other—or
until stopped by reaching
the end of the worm.
NOTE—In cases where the balls
are stopped by the end of the worm, hold down those balls already dropped
into the nut with the blunt end of a clean rod or punch, Fig. 21. and turn
the worm in the reverse direction a |
|||
|
Fig. 23—Removing or Replacing Ball
Guides |
|||
|
|
|||