1942 - 1947 CHEVROLET SHOP MANUAL
Section 5 - Brakes
|
|
|||
|
5-6 |
|||
|
|
|||
|
BRAKE SHOE ADJUSTMENT
Passenger Cars, 1/2 and 3/4-Ton
Trucks
1. Raise the car and place stand jacks front
and rear so that all four
wheels rotate freely.
2. Disconnect the emergency brake cables at the
idler lever. This precaution
should be taken to eliminate
the possibility of the brake shoes dragging the drum due to misadjustment of
the emergency
brakes.
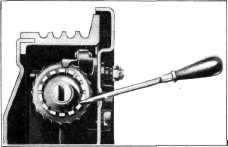
3. Remove the adjusting hole covers and insert
a screw driver through the
adjusting hole and engage the
teeth on the adjusting cover of the wheel cylinder, Fig.
14. |
click of the cover lock spring as
the cover is turned. This backing-off of the adjusting cover moves the
brake shoe away from the drum to
insure proper running clearance of the shoes in the
drum. |
||
 |
|||
 |
|||
|
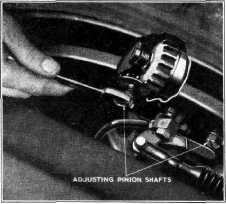
Fig. 15—Adjusting 1-1/2-Ton Truck Rear
Brakes |
|||
|
EMERGENCY BRAKE ADJUSTMENT
The
emergency brake adjustment should be checked each time the hydraulic service
brakes are adjusted.
When making
an emergency brake adjustment the
service brakes must be properly adjusted first as a base for adjusting the emergency
brakes:
1. Set the emergency brake lever in the fully
released
position.
2. Loosen the check nuts at the cable
ends.
3. Pull the cables out of the conduit by hand
until a positive stop it
felt. While holding the cable in this position, adjust the check nuts
against the clevis plates. Then tighten the check nuts securely. Figure 3 shows the location of the
adjusting nuts on the
emergency brake cables.
BRAKE LININGS
Inspection
After removal of the brake drums
and before disassembly of the shoes
from the flange plate, all linings should be inspected for wear,
improper alignment causing uneven wear and oil or grease on linings. If
any of these conditions exist, it will be necessary to replace or reline the shoes.
If in checking the lining it is noticed that they have the appearance of being glazed, this a normal
condition with the hard type lining used. Do not use a
wire brush or any abrasive on the lining to destroy this glazed surface as it is essential for
proper operation. |
|||
|
Fig. 14—Adjusting Brakes Through Slat In Flange
Plate |
|||
|
Turn the
adjusting cover in a clockwise direction looking at the end of the
cylinder, until the shoes cause a
slight drag on the brake drum.
4. When the "drag" condition is
reached, turn the adjusting cover
back, the opposite direction. four (4) notches. Repeat this operation on
each shoe in each
brake.
BRAKE SHOE ADJUSTMENT
1-1/2-Ton and C.O.E. Trucks
The
adjustment of the front brakes on the 1-1/2-ton and C.O.E, trucks is the same as for
passenger cars with the
exception that the wheel cylinder adjusting covers are backed off five (5)
notches instead of four (4).
To adjust
the rear brakes on these trucks use a 5/8" open end wrench to turn the adjusting
pinion.
1. Turn the adjusting pinion in a clockwise
direction until the shoe
causes a slight drag on the brake drum, as shown in Fig.
15.
2. Turn the adjusting pinion back in the
opposite direction 3/4 of a
turn to provide running clearance.
The backing-off of the adjusting
cover, the specified number of
notches will be indicated by a faint |
|||
|
|
|||