1942 - 1947 CHEVROLET SHOP MANUAL
Section 6 - Engine
|
|
|||
|
6-8 |
|||
|
|
|||
|
12th—Mount the feed screw support
bracket "G" on the front boring bar support. Mount the feed screw "I" in
its U-shaped yoke and install the screw in the end of the boring bar.
Adjust the bar so that the cutters are just about to enter the bearings;
then tighten the two feed screw support thumb screws.
13th—Install the turning handle on
the end of the boring bar and proceed with the boring operation. During
this operation, use a liberal supply of kerosene to keep the cuttings
washed out of the bearings.
14th—After the cutters have passed
through the bearings, remove turning handle and feed screw. Blow all
cuttings out of the bearings with compressed air, being careful not to
blow the cuttings into the boring bar support bearings.
15th—Slide the boring bar back
until the cutters have passed through the bearings: then again install the feed screw and bore
through the bearing a second time. This is very important in order
to obtain a perfectly smooth true bearing.
16th— Remove turning handle, feed
screw, cutters and boring bar. Do not disturb the boring bar supports because they will be used
when facing rear-intermediate bearing for crankshaft end thrust
clearance.
Rear Intermediate Bearing
The rear intermediate main bearing
takes the crankshaft end thrust. Therefore it becomes absolutely
necessary when replacing main bearings to use an accurate tool to face the
flanges of this bearing to the correct width so that the crankshaft will
have the proper end thrust clearance.
Facing the Rear Intermediate Bearing
1. Install the boring bar through the
centering bushing and the rear
bearing support. Slip the facing cutters on the boring bar, one on
each side of the rear
intermediate bearing.
2. Place the feed screw sleeve in the front
intermediate bearing and
push the boring bar through the
sleeve. Install the feed screw drive key through the hole in the sleeve and into
No. 2 cutter hole in the boring
bar, locking the key in place
with its screw.
3. Adjust the feed screws for equal feed range
on each side of the front
intermediate bearing. Adjust
the facing cutters to provide about .015" clearance between the cutter face
and the flange of the bearing.
Lock the cutters to the boring
bar with the clamp screws. |
4. Caliper the width of the rear intermediate
bearing journal on the
crankshaft with the special inside and outside calipers,
KMO-964.
5. Install the turning handle on the end of the
boring bar. Back off the front
feed screw collar several
turns and tighten the rear feed screw collar until the front facing cutter
contacts the bearing flange.
Then proceed with the facing operation, tightening the feed screw as
necessary to keep the
cutter in contact with the bearing flange.
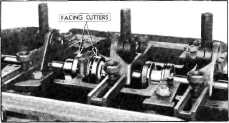
The front flange of the bearing
should be machined just enough to thoroughly clean up the face. The proper
installation of this tool is shown in Fig. 12. |
||
 |
|||
|
Fig. 12—Facing Rear Intermediate Main Bearing
6. Back off the rear feed screw collar and
tighten the front collar until
the rear cutter engages the
bearing rear flange. Then continue with the facing operation, checking the progress
of the job every few turns with
the special caliper that was
set for the width of the crankshaft journal. Continue facing the bearing
until the special caliper will
pass over the bearing and a .004" feeler laid alongside the bearing
flange.
Remove the bearing cap and place
it on the rear intermediate journal of the crankshaft. Check the end
clearance with a feeler gauge; the correct clearance is .004" to
.007".
7. Disassemble the facing cutters and boring
bar from the cylinder block.
All parts of this tool should
be thoroughly cleaned and oiled to prevent rusting, and put away in
the special boxes provided for
this purpose.
Crankshaft Rear Bearing Oil Seal
Sealing at the crankshaft rear
bearing is made very effective due to machining the rear bearing cap and
Crankcase to receive a wick-type seal. Fig. 13.
To install a new wick seal in the
rear main bearing cap, insert the seal in the groove with the
fingers. Then using a rounded tool, roll the seal |
|||
|
|
|||