1942 - 1947 CHEVROLET SHOP MANUAL
Section 6 - Engine
|
|
|||
|
6-10 |
|||
|
|
|||
 |
tion and
endwise movement. They are accurately line reamed at the time of assembly,
assuring proper alignment of
the camshaft. These bearings are lubricated through holes which line up
with the oil passages leading
from the main bearings.
To remove,
replace, and line ream the camshaft bearings in service; a set of special tools
is necessary. This set
consists of a removing and replacing bar, four removing and replacing
sleeves, a bracket which is
attached to the rear of the cylinder block and a special camshaft bearing
reamer shown in Fig. 16. These
are the same tools that have
been used since the 1937 model for replacing camshaft
bearings. |
||
 |
|||
|
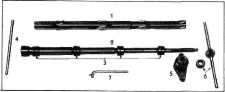
Fig. 16—Camshaft Bearing Removing and Replacing
Toots
1 Reamer
4 Extension
Handle
2 Removing and
Replacing 5 Bracket
Bar
6 Handle and
Thrust
3 Removing and
Replacing
Bearing
Sleeves
7 Staking Tool
Camshaft Bearing Removal
1. After removal of the camshaft, drive out
the expansion plug from the
cylinder block at the rear of
the rear camshaft bearing, by driving it out from the inside.
2. Assemble the camshaft bearing remover
bracket loosely to the rear of
the cylinder block.
3. Start the bearing puller bar through the
front bearing and install the puller sleeve for each bearing over the bar
before it passes through that
particular bearing. Then pass the bar through the hole in the bracket. Tighten the
bolts that hold the bracket to
the Crankcase. Then install the
thrust bearing and puller handle on the end of the
bar.
4. Turning the puller handle clockwise will now
remove all four bearings at one
time. An extension handle
is provided to aid in starting bearings that may have corroded in the
case.
Camshaft Bearing Replacement
1. To make
sure that the oil holes in the camshaft bearing bores will line up with the oil
holes in the camshaft bearings
after the bearings have
■ been
installed, mark the position of the oil hole in the bore on the front face of the bearing
bore. |
|||
|
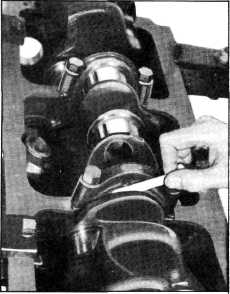
Fig. 15-Checking Crankshaft End-Ploy
(turning it
by hand) with the bolts pulled down tight. Then replace one .002" shim on one
side for clearance, again tighten the bolts and check for drag. The crankshaft should now roll freely
without any indication of
a drag.
Loosen the
bolts on the bearing that has just been adjusted and proceed to adjust the next
one in the same manner and so on until all bearings have been adjusted.
When
adjusting the bearings, shims should be removed evenly. If an uneven number of
shims have to be used, it is
good practice to have the greater number of shims on the same side
of all bearings.
By
following the procedure of removing shims to check and then replacing one .002" shim,
there will be no possibility
that the bearing will be too loose. Then if the crankshaft may be turned
freely by hand, it is certain that the bearing is not too tight.
If the
shaft turns freely by hand, after all bolts have been tightened, you know the bearings
are properly
adjusted.
CAMSHAFT BEARINGS
All four
of the camshaft bearings are steel backed, babbitt lined. They are pressed into
the crankshaft and staked into
place to prevent rota- |
|||
|
|
|||