1942 - 1947 CHEVROLET SHOP MANUAL
Section 4 - Rear Axle, Universal Joints & Springs
|
|
||||
|
4-7 |
||||
|
|
||||
|
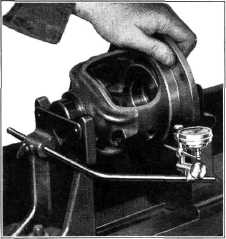
2. Place
the differential case in the "V" blocks of the checking fixture U-4 and indicate
the run-out of both the ring
gear pilot and the case flange,
Fig. 10. Neither of these run-outs should exceed
.001". |
flush with the face of the case.
Remove the guide pins and install the
remaining bolts. |
|||
|
Tighten all ring gear
bolts.
NOTE—New lockwashers should
under the head of each bolt. |
be used |
|||
 |
||||
|
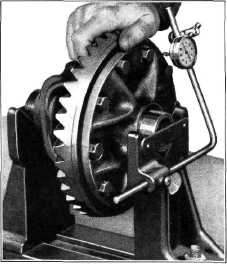
With the
assembly mounted in "V" blocks, check
the run-out of the back face of the ring gear with a dial indicator. Fig. 12. This
runout must not exceed
.004". |
||||
 |
||||
|
Fig. 10—Checking Run-Out of Differential
Case
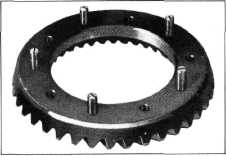
When
replacing the ring gear, it is good practice to use five guide pins made by cutting
the heads from 3/8"—24 cap
screws about 1-1/2" long. Slots should be cut in the heads of these
guide pins so that they may be
easily removed. Install
these guide pins in alternate bolt holes in the ring gear, Fig. 11, and slip the ring
gear over the pilot diameter of
the case, making sure |
||||
|
Fig. 12—Checking Run-Out of Back Face of Ring
Gear
Assembling the Rear Axle
1. Assemble the same thickness of shims in the
counterbore of the propeller
shaft housing that were removed
when the assembly was taken down (if the original ring gear and pinion are
to be used), making sure that
the shims are flat in the
counterbore and are not cocked. The total thickness of the shims will be found
to be from .030" to .036" and
usually .033". Shims are
serviced in thicknesses of .012", .015", .018", and .021" so that a combination of
shims may be selected to
replace the original ones if they are damaged.
NOTE—Whenever a new ring gear
and pinion is installed, one .015" shim and one .018" shim should be used
as this is the standard setup.
2. Coat the beveled surface of the pinion
bearing lock sleeve with rear
axle lubricant, and as- |
||||
 |
||||
|
Fig. 11—Use of Guide Pins in Ring
Gear
that the
back face of the ring gear and the face of the case are free from dirt and burrs.
Install every other ring gear
bolt and draw them up evenly
and snugly so that the ring gear face is |
||||
|
|
||||