1942 - 1947 CHEVROLET SHOP MANUAL
Section 4 - Rear Axle, Universal Joints & Springs
|
|
|||
|
4-12 |
|||
|
|
|||
|
on the
outer race using a long 1/8" punch through the cap screw holes in the end of
the hub. This will also bring
out the inner race and roller
assembly.
NOTE—Care must be taken to
engage the edge of the race with the punch and not damage the bearing seat
in the housing. The race must also be driven out evenly.
Replacement of Rear Wheel Bearings
1. Check the fit of the inner races on
housing; these races should be
free to turn, but not loose.
2. Wash the bearings in clean gasoline or
cleaning solvent and pack the
roller assembly with No. 2-1/2
soft, smooth cup grease.
3. To replace the outer bearing, place the
inner -race-and-roller
assembly, and the outer race in the wheel hub with the thin edge of the
outer race downward. Use outer
wheel bearing re-placer,
J-872-1, to press the bearing in the hub. |
side of
the race down. Use special driver J-872-4 to press the race against its seat.
Install the inner race
and roller assembly. Install the oil seal, using the wheel bearing oil
seal replacer J-872-2, with an
arbor press. Lock the seal in
place by prick punching at three equally spaced
places.
5. Install the wheel hub and drum assembly,
turning the hub to properly
line up the bearings.
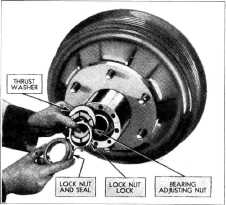
6. Install the thrust washer and adjusting
nut, |
||
|
Fig. 20. |
|||
 |
|||
 |
|||
|
Fig. 20-lnstalling Thrust
Washer, Adjusting Nut, Lock Nut and Loch Nut Lock
Adjustment of Rear Wheel Bearings
1. Using special wrench J-870, tighten the
adjusting nut tight, then
back it off 45 degrees. Turn the wheel hub by hand to make sure the
hub turns
freely.
2. Install the adjusting nut lock and check the
alignment of the tangs with
the slots in the nut.
3. Rotate the hub by hand, grasping the hub at
the wheel bolts, to see that
the bearings are properly
seated and that the hub turns freely.
4. Bend the tang on the lock down into the
notch of the adjusting nut.
Install the outer lock nut and
pull up tight to prevent any loosening of the adjusting nut. Bend the tang of the lock
into the notch of the lock
nut.
5. Install the axle shaft, using a new
aluminum gasket.
6. Install new capscrew lock
plate.
7. Install the axle shaft bolts and tighten
securely.
Replacement of Oil Slinger
The
location of the oil slinger requires that it be driven on the rear axle housing. If for
any |
|||
|
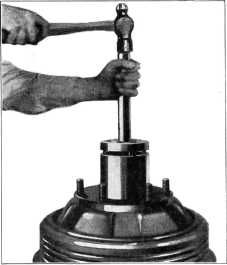
Fig. 19—Driving Outer Race Into Contact With Snap
Ring
CAUTION—Press the race only far
enough to install the snap ring; this operation should be done in an arbor
press.
Install the
snap ring in the groove on the inside of the hub. Use special driver J-872-3
through the cap screw holes in
the end of the hub to force the outer race back in positive contact
with the snap ring, Fig. 19.
4. To
replace the inner bearing, place outer race of the bearing in the wheel hub with the
wide |
|||
|
|
|||