1942 - 1947 CHEVROLET SHOP MANUAL
Section 6 - Engine
|
|
|||
|
6-7 |
|||
|
|
|||
|
necessary to replace the clutch
housing, the new housing must be
assembled to the block and checked before main bearings are
installed. The housings furnished for service are selected and are interchangeable with the production
part.
Main Bearing Boring Machine
This unit consists of the
following parts, Fig. 10.
A—Support
Bracket and Clamps
B—Universal Clamp
Bolts
C—Boring
Bar Supports and Ball Bearings
D—Boring Bar Centering
Bushings
E—Clutch Housing Centering
Bushing
F-Boring
Bar
G—Boring
Bar Feed Support Bracket
H-Feed Nut
Yoke
I—Feed Screw
J—Turning
Handle K—Boring Bar
Cutters
The
operations for replacing main bearings are as follows:
1st—Support the Crankcase in the
motor stand
with
bearing side of case up. 2nd—Remove
old bearings and see that case is
well cleaned.
3rd—Install centering
bushings "D" in the front and rear bearing bores and install the
bearing caps without
shims.
4th—Thread
the boring bar "F" through the bushings from the rear to the front. Then
mount the dial gauge on the
boring bar and check the
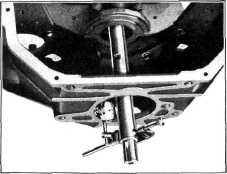
alignment of the transmission pilot hole in the clutch housing, Fig. 11.
The runout must not exceed
.015". If it does, it will be
necessary to replace the clutch
housing before proceeding with the installation of the new main
bearings. |
5th—Remove the boring bar and the
centering bushing from the rear
bearing. Then install the
clutch housing centering bushing "E" in the transmission pilot hole of the clutch
housing.
6th—Install
the boring bar through the rear centering bushing and thread the boring bar
support bearings "C" over the bar, locating one support in the space
between each two bearings. Be
sure to push the boring bar through the front centering bushing beyond
the reduced diameter portion.
7th—Install the boring bar support brackets "A" and line them up so there will be clearance
between the bearing cap and
support bracket for the
installation and removal of cutters. Clamp the support brackets firmly
to the oil pan rail of the
cylinder block. 8th—Tighten the
universal clamp bolts "B" on each support bracket evenly. As the
bolts are being tightened, the boring bar should be turned by hand to make sure that it is
free to turn without any
indication of a bind. Remove
the boring bar and the front centering bushing. 9th—Install the bearing shells in the
cylinder
block and
caps.
NOTE—The front and
front intermediate bearing shells are very similar in
appearance and it is possible to get them mixed. The front
intermediate shells are
identified by the letter "I" in the bottom of the oil groove. Should
the intermediate
bearing shell be installed in the front bearing bore, the sides of the
bearing would be too
high and would not permit the cap to seat firmly on the shims.
10th—Place four .002" shims
on each side of each bearing
and install the caps. The intermediate bearing caps are marked
"front" and "rear" for identification
purposes. The front
intermediate bearing cap is installed with the "FRONT" mark to the front of the
engine and the rear
intermediate bearing cap is
installed with the "REAR" mark to the rear of the engine.
The rear
intermediate bearing shell is flanged
because it takes the end thrust of the crankshaft.
Tighten the
bearing cap bolts evenly and make
sure they are drawn down tight. 11th-Examine the boring bar to make sure
the cutter scats are clean; then install the bar through the rear centering bushings and
bearing supports. Examine the
cutters to make sure they are
clean and install them in the
slots in the cutter bar. Cutters are lettered F-FC-RC-R to designate front,
front center, rear center, and
rear. |
||
 |
|||
|
Fig. 11— Checking Transmission Pilot Hole in Clutch
Housing |
|||
|
|
|||