1942 - 1947 CHEVROLET SHOP MANUAL
Section 1 Body
|
|
||||
|
1-5
|
||||
|
|
||||
|
is opened or closed,
Fig. 9. A step in the spring holds the door in the open position until
it is pulled shut manually.
Front Door Weatherstrips
Due to the design of
the front door hinges, and the door check and hold-open device, the
rubber weatherstrips and method of attachment differs somewhat from
rear doors.
Six (6) separate
pieces comprise the complete front door weatherstrip, including molded
lower corner pieces and the specially formed hinge pillar section with
slots for positioning with relation to the weatherstrip retainer.
|
Rear Door Weatherstrips
Five (5) separate
pieces comprise the complete rear door weatherstrip. All pieces are
cemented to the flange of the door outer panel. The piece extending
along the bottom of the door, in addition to being cemented in place,
is also held by three clips, one in the center and one at each end.
Weatherstrip Replacement-All Doors
Weatherstrip
replacement operations are the same on all doors with one exception.
When the front door hinge pillar piece is removed or replaced it is
also necessary to remove and reassemble the special retainer used at
this point.
The following
procedure covers partial and complete weatherstrip replacement:
1. Remove
the loose weatherstrip from door flange.
Thoroughly clean the door flange
using only clean, clear
gasoline or naphtha. (Do not use
Ethyl or any other treated
gasoline for cleaning door
flange or weatherstrip.) Sand off all rust spots and make certain that
the door flange is
thoroughly clean and dry.
2. Thoroughly
clean the base of the weatherstrip
-that
surface which will fit against the door
flange, using clean, clear
gasoline, and be sure this
surface is absolutely dry before applying
any cement. (This applies when
using new weatherstrips out
of stock and when reassembling
an old weatherstrip.)
3. Using
a 1/2" stiff paint brush, and FS 655
cement, brush or paint on evenly
and lightly one coat of
cement to the cleaned door flange surface, and one coat to the clean
dry base of the rubber weatherstrip. Allow the cement on each surface
to dry a few minutes, until tacky
—usually four or five minutes.
NOTE-To produce the
best results, the FS 655 cement should be of a creamy thin
consistency. Should this cement become too thick, it should be
thinned, using clear, clean gasoline—do not use Ethyl or any other
treated gasoline.
4. After
allowing the cement to become tacky, carefully locate each piece of
weatherstrip to its proper
position on the door. DO NOT
STRETCH ANY PART OF THE WEATHERSTRIP!
NOTE-Best results
will be obtained if each piece of weatherstrip is allowed to position
itself on the door rather than to attempt stretching it into position.
5. After
positioning, start at the center of each
piece and press it firmly onto
the flange-working toward
each end from the center. A
block of wood under clamps is
helpful in hold-
|
|||
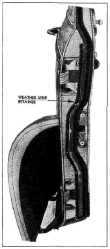 |
All pieces of this weatherstrip
are
cemented to the door
outer flange with exception
of the front vertical
piece between the door
crease line and the bottom of
the door. This specially
formed piece is cemented
to the face of the hinge
pillar, and is also held
in position by a special
weatherstrip retainer.
The retainer fits over
the edge of the
weatherstrip and is held by
six screws to the door
pillar. The retainer is
shown removed in Fig. 10.
In addition to the cement used,
the bottom piece of
weatherstrip
|
|||
|
|
||||
|
10-Front Door
Weatherstrip and Retainer
|
along the lower flange
of the door, is also held
|
|||
|
by three clips, one in the center
and one at each end.
To insure against
water leaks due to the weatherstrip attachment to the face of the
hinge pillar, and to provide a flush surface for the weatherstrip to
seal against, stamped sheet metal plates, held by two screws, are used
to bridge over the door hinges and hinge recesses in the door pillar.
The hinges and recesses alongside the hinges are filled with FS-638
sealing compound to prevent water entering under these plates.
Stamped plates of the same design and method of attachment, are used
to bridge over the body pillar half of the hinges to insure a flush
surface for the weatherstrip to seal against when the door is closed.
The same method of sealing is used under these plates at the hinges
and hinge recesses on the body pillar.
|
||||
|
|
||||