1942 - 1947 CHEVROLET SHOP MANUAL
Section 12 - Electrical System
|
|
|||
|
12-30
|
|||
|
|
|||
|
As the tank is filled with gasoline, more current
is passed through the operating
coil and the reading, of course, is higher and, as the tank
empties, less current is passed
through the operating coil
and the reading is lower.
If trouble is experienced with either the tank
or dash unit, replacement of the
unit is the only remedy.
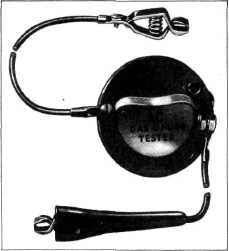
The following is a
procedure for locating trouble in the gasoline gauge, using KMO-204,
Gas Gauge Tester, Fig. 62:
A-1. With ignition switch "OFF," disconnect
tank wire from back of dash unit.
(This is the larger
terminal.)
2. Attach
the red wire of the tester to this
terminal and black wire to a good
ground.
3. Turn
ignition switch "ON"-move tester arm
up and down, dash unit should
register "FULL" and "EMPTY"
if it is OK. If so, turn
ignition switch "OFF" and reconnect
tank wire.
4.
If dash unit does not register at
all on above test-before
replacing it make certain that it is getting current from the ignition
switch. This can be quickly
tested by connecting a
6-volt lamp from ignition terminal (left
hand terminal on back of dash
unit) to ground.
|
1. Disconnect
tank unit wire near the gas tank
at the bayonet connection or
terminal junction block.
2. Attach
the red wire of the tester to the con-nection
running to the dash and the black
wire to ground.
3.
If on this test dash unit reads
"EMPTY" at all times or the
reading is noticeably
lower than during the check at the dash
unit, look for shorts or leaks in
the wiring between dash
and tank. Leaks are most
likely to occur at terminal junctions. If dash
unit reads above "FULL" at all
times or if it reads higher
at "EMPTY" and "FULL" than
readings obtained when checking at the
dash, look for poor connection or
break in the wiring. Be
sure contacts in bayonet connectors
are clean.
C-1. If dash unit and
wiring check OK, drop tank and
remove tank unit. Clean away all dirt
that has collected around tank
unit terminal as road dirt,
particularly calcium chloride, causes an electrical leak that will
cause an error in reading.
2. After
cleaning thoroughly, connect tank unit
to the wire leading to dash,
grounding the tank unit
with a short piece of wire from the
outer edge to any part of the car.
Turn ignition switch "ON"
and move the float arm up
and down. If this unit is OK, the dash
unit will give corresponding
"EMPTY" and "FULL"
readings.
3. If
tank unit is OK, reinstall in the tank-if
not, replace with a new tank unit
but first repeat above test
before installing in the
tank.
NOTE-Always check
tank units for freedom of movement of the float arm by raising it to
various positions and observing that it will fall to "EMPTY" position
in every instance.
LIGHTING SWITCHES
The passenger car lighting switch is designed
with a rheostat connected in
series with the instrument
lamp circuit. Turning the switch knob to the
right or left varies the
brilliancy of these lights or they may be turned off entirely, Fig.
63.
By pulling the switch control button out to the
first position, the parking lamps,
instrument lights, license
plate light and both tail lights are lighted.
The parking lamps consume a very
small amount of current,
thus minimizing the current consumed
while the car is parked.
|
||
 |
|||
|
Fig. 62-Gasoline Gauge Tester
B-If dash unit is OK, next check the wiring between
dash and tank units as follows:
|
|||
|
|
|||