1942 - 1947 CHEVROLET SHOP MANUAL
Section 4 - Rear Axle, Universal Joints & Springs
|
|
|||
|
4-6 |
|||
|
|
|||
|
3. The pinion assembly may now be assembled to
the propeller shaft by
pressing the splined end into
the coupling on the end of the propeller shaft so that rivet hole in the pinion
shaft lines up with the hole
in the propeller shaft. Insert
a new rivet in this hole and rivet over both ends.
4. Tighten the bearing lock nut and lock it in
the milled slot in the pinion
shaft.
Differential Assembly
1. Examine both differential side gear bearing
surfaces in the differential
case; also the backs or thrust
surfaces for these gears and the differential pinion gears.
2. Check both differential side bearings for
roughness after they have been
thoroughly cleaned and
oiled.
3. Remove the lock wire from the ring gear
bolts and check each bolt to
make sure they are all tight.
4. Inspect the differential side gears for
scored hubs or thrust surfaces.
Examine the internal splines
and check their fit on an axle shaft. |
Differential Bearing Replacement
The
differential side bearings are a press fit on the hubs on each side of the differential
case. These bearings must be
removed and replaced as follows:
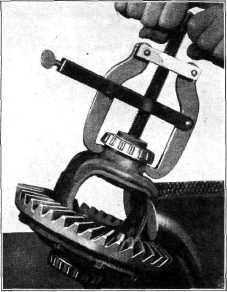
1. The legs of differential bearing puller,
TR-278-R, should be fitted into
the two notches in the case
and the clamp screw tightened, Turning the puller screw will remove the
bearing without damage to
either the bearings or the case, Fig. 8.
2. After the bearings have been removed, they
should be thoroughly cleaned,
oiled and then checked for
roughness. |
||
 |
|||
 |
|||
|
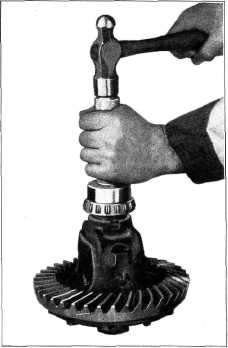
Fig. 9—Replacing Differential Bearings
3. To
replace the differential side bearings, place them on the hubs with the thick side of the
inner race toward the case and
drive them in place with J-994 differential side bearing replacer, Fig. 9.
Ring Gear Replacement
1. Remove
the bolts. The ring gear may then be tapped off the case with a soft faced
hammer. |
|||
|
Fig. 8—Removing Differential Bearings
5. Inspect
the thrust surfaces on the differential pinion gears and check their fit on the
pinion shaft. |
|||
|
|
|||