1942 - 1947 CHEVROLET SHOP MANUAL
Section 4 - Rear Axle, Universal Joints & Springs
|
|
|||
|
4-35 |
|||
|
|
|||
|
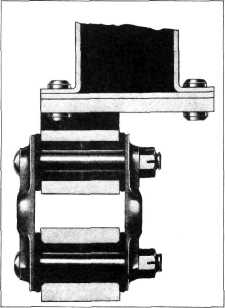
The rubber
bushings fitting in each spring and hanger eye are in two halves due to
the shoulder at the outer end of
each. When installed and prior to tightening the lock nuts, the bushings are
1/4"
longer than the space
between the two shackle plates
when tightened in place. Tightening the lock nuts until the inner plate bottoms on the
pin shoulders, forces this
excess rubber into the eye and around the pins, resulting in a tightly
locked joint. The castellated
sections of the special lock nuts tighten firmly against the pin threads when
the nuts are pulled up
tightly.
All shackle
movement in relation to the spring and
hanger eyes is taken by the flexibility of the rubber bushings,
since the pins are solidly locked to
the bushings, and the bushings cannot turn in the eyes, Fig.
67. |
1. Raise the car as necessary to provide the
proper distance between
the spring hanger and spring
eye to install the shackle.
2. Wipe free of all dirt and grease, the
bushing holes in the spring
hanger and spring eye, both shackle plates and pins, and the inside and
outside of both
bushings.
3. Install one bushing in the hanger and
spring eye (two halves to each
bushing) with the bushing shoulder or collar to the outside of each
hole.
4. Insert the shackle pins through the bushings
(plate with pins attached)
with the attached shackle
plate toward the outside of the car, threaded ends of the pins toward the car
centerline.
5. Install the inner shackle plate, and tighten
the lock nuts about halfway
onto the pins.
6. Lower the car and allow to stand normally
with the weight on the wheels
at curb weight—no passengers
or load in the car. Bounce the back end of the car up and down several times to
center and seat the rubber
bushings. Then, when the car
comes to rest normally, tighten both lock nuts until the inner shackle plate
"bottoms" on the shoulders of
the pins.
This type
shackle requires no lubrication at any time, and during car lubrication periods
care should be exercised to
prevent the spraying of lubricant of any kind on these shackles—this
also applies to the
spring seats and rear spring front eye attachment, since these
points also are rubber insulated.
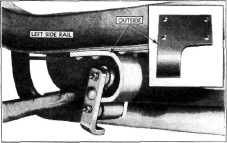
Rear Spring Hanger
The "U" shaped rear spring hanger
on passenger cars is attached to the
underside of the frame side rail by four rivets, Fig.
68. |
||
 |
|||
 |
|||
|
Fig. 67—Rubber Spring Shackle
To remove
this shackle it is only necessary to raise the car enough to relieve the load,
remove the two lock nuts and inner shackle plate which
relieves the pressure or load on the bushings. The outer shackle plate with pins, and all
bushings may now be removed
from the spring and hanger eyes.
To install
the rubber bushed spring shackle proceed as
follows: |
|||
|
Fig. 68—Passenger Car Rear Spring Hanger
When
replacing this spring hanger the following procedure should be closely
followed: |
|||
|
|
|||