1942 - 1947 CHEVROLET SHOP MANUAL
Section 4 - Rear Axle, Universal Joints & Springs
|
|
|||
|
4-37 |
|||
|
|
|||
|
frame
into the body. Moreover, with this mounting, there is no metal-to-metal
contact.
Adjustment of the passenger car
rear spring seats should always be
made with the weight of the car on its wheels. The eye bolt nut should then
be loosened and the car jolted
up and down several times to
set the rubber bushings in their normal position. The eye bolt nut should then be
drawn down tight and a cotter
pin installed.
FITTING 1/2-TON TRUCK REAR SPRING SEATS
If it becomes necessary to adjust
the rear spring seats on the truck models the correct clearance
between the spring seat and the
rear axle housing may be
obtained as follows:
1. Jack up the rear end of the truck and block
it in this position by using car horses under the frame side rails.
2. Disconnect the spring shackle and drop the
rear end of the
spring.
3. Remove the spring
U-bolts.
4. Remove the two screws from the lower spring
seat cap and remove both halves of the spring seat.
5. Clamp the two halves of the spring seat in a
bench vise and file evenly
from face of each half.
Assemble the spring seat to the axle housing and check the fit of the
seat on the housing. Continue
to file evenly from both halves until such a fit is obtained that a slight drag is
felt when turning the spring
seat on the axle housing. |
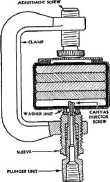
3. Set the
adjustment screw of the lubricating clamp, Fig. 70, until the width of the
clamp is a little more than
the spring thickness. |
||
 |
|||
|
Fig 70—Spring Lubricating Clamp
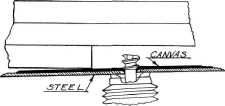
4. Push the threaded end of the plunger into
the drilled hole, forcing the
canvas against the plate.
5. Screw the plunger several times to the
right to thread the end through
the canvas, Fig. 71.
6. Screw the sleeve against the bottom of the
spring cover. Never use pliers. |
|||
 |
|||
|
SPRING LUBRICATION
When
lubricating springs having metal covers, use a soft, smooth cup grease to which 8%
to 10% graphite has been
added. This compound should be
applied in such a way that it is forced between the leaves of the springs and not between
the canvas liners and the
springs covers. This can be done with the use of a spring lubricating clamp
J-595, as
follows:
1. Jack up the frame to remove the load and
allow the spring leaves to separate,
2. If the spring cover has no hole, drill a
3/16" hole in the center
of the bottom, one-third of the way from the spring
eye. |
|||
|
Fig. 71 — Position of Plunger for Lubricating
Spring
7. Attach the grease gun hose to the fitting
and apply pressure
slowly.
8. Separate the main and second spring leaves
with a screwdriver so the
lubricant can go between.
9. Remove the screwdriver and attach a "C"
clamp at the end of the spring
cover. Continuing to
apply pressure will force the lubricant
• toward the opposite
end. |
|||
|
|
|||