1942 - 1947 CHEVROLET SHOP MANUAL
Section 5 - Brakes
|
|
|||
|
5-5 |
|||
|
|
|||
|
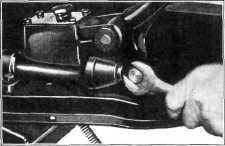
draulic
brake fluid. This lubrication results in a better formation of the flare. Loosen
the clamping nuts on the
flaring tool and insert finished
end of the tubing in the channel of the die until it bears against the stop pin,
Fig. 9. |
flange plates have openings with
spring snap covers to simplify brake adjustment.
Toe-board clearance very seldom
needs to be adjusted. The pedal stop,
located in the brake main cylinder, is permanent. Before attempting
to adjust this stop, be certain that the pedal returns to the full
released position freely, with no binding, and that the pedal retracting
spring has not lost its tension.
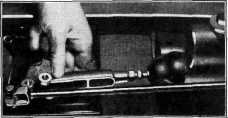
TOE-BOARD CLEARANCE-PASSENGER CARS
1. Loosen check nut on the eccentric
bolt.
2. Turn the eccentric bolt, Fig. 12, in the
proper direction to secure
7/16-inch toe-board clearance.
3. Tighten check
nut. |
||
 |
|||
|
Fig. 9—Installing Tubing to Proper
Depth |
|||
|
Tighten
the clamping nuts by hand and place the
fixture in a bench vise. Then tighten down the clamping nuts firmly with a wrench
and remove the stop pin from
the die. The tubing is now
firmly gripped in the die and ready for the first flare forming
operation.
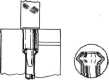
3. Using the flare forming tool
having the concave die, insert the
forming tool in the die and strike firm blows, using a one pound
hammer, until the shoulder of the tool contacts the top of the die. The
cross section drawing. Fig. 10, shows the first step in forming the
double-lap flare. |
|||
 |
|||
 |
|||
|
Fig. 12—Adjusting Pedal Toe-Board Clearance—Passenger
Cars
TOE-BOARD CLEARANCE-TRUCKS
1. Loosen the check nut on the rear of the
clevis on the main cylinder
push rod.
2. Remove clevis pin and turn the clevis
attached to the main cylinder
push rod, Fig. 13, in the proper direction to secure 1/4" toe-board
clearance—measurement being
taken between pedal arm and
underside of toe-pan.
3. Tighten the check nut against the
clevis. |
|||
|
Fig. 10—First Flaring
Operation |
|||
|
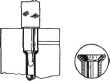
4. Next, use the flare forming
tool having the 45 degree die at its lower end. Insert the tool in the die and strike firm blows, using a one
pound hammer, until the shoulder of the tool contacts the top of
the die. The cross section drawing. Fig. 11, shows the second and final
forming operation in making a double-lap flare. |
|||
|
|
|||
 |
 |
||
|
Fig. 11— Finish Flaring Operation |
|||
|
HYDRAULIC BRAKE ADJUSTMENT
Chevrolet hydraulic brakes can be
adjusted without the removal of the
wheels as all brake |
|||
|
Fig. 13—Adjusting Pedal Toe-Board
Clearance—Tracks |
|||
|
|
|||