1942 - 1947 CHEVROLET SHOP MANUAL
Section 5 - Brakes
|
|
|||
|
5-7 |
|||
|
|
|||
|
Satisfactory
performance can be obtained by replacing only the forward shoes when the
reverse shoe linings do not
show excessive wear. Tests have shown that in most cases the reverse
lining will outlast two sets
of forward linings. This is true of both front and rear wheel
brakes.
Shoes
should be changed in sets; that is, both forward shoes on the front wheels, or both
forward and reverse shoes on
front wheels. The same is true
on the rear wheels. |
2. Install wheel cylinder clamp. Fig. 16
(J-718C) to keep the wheel
cylinder pistons in place and prevent leakage of brake fluid while
replacing shoes.
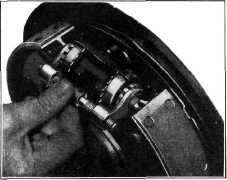
3. Remove brake shoe retracting spring with
special pliers, Fig.
17.
4. Remove conical guide springs, Fig.
1.
5. Remove brake shoe anchor pin lock and pin.
On rear brakes—remove toggle
lever, eccentric bolt and nut from the rear brake
shoe.
6. Disassemble articulating links from shoes
by removing friction spring pin
locks, pins and springs.
BRAKE SHOE REMOVAL
1-1/2-Ton and C.O.E. Trucks
The removal
and replacement of the brake shoes of the l-1/2-ton and C.O.E, trucks is
identical with that of the passenger
cars except for three slight variations in the design of the
hook-up.
1. It is necessary to remove the wheels and
brake drums with the wheel
hubs to replace brake linings, necessitating the readjustment of
the
wheel bearings.
2. The toggle mechanism of the passenger car
emergency brakes at the rear wheels is replaced on the trucks by a lever and link
assembly. This lever and
link assembly is attached to
the rear brake cable on the outside of the brake flange plate. The lever on the inside,
as it is actuated by the
emergency brake lever to set
the brakes, moves the links outward expanding the brake shoes. Each link has a
support at its outer
end.
3. Each brake shoe of the rear brakes has an
individual anchor
pin.
BRAKE SHOE RELINING
1. Remove the rivets, using the deliner
punches in a brake shoe
relining machine.
2. Wash the shoes in gasoline or other cleaning
fluid, then buff them on a
wire buffer.
3. Install new lining in place on shoe and
rivet two holes at
center.
4. In order to eliminate air pockets between
lining and shoe which
might cause uneven contact or squeaky brakes, a brake shoe
lining clamp should be used to force
the lining against the shoe. Fig. 18.
5. After the end holes in the lining and shoe
are in alignment, the rivets
may be installed in both ends,
Fig. 19. |
||
|
BRAKE SHOE
REMOVAL
Passenger, 1/2 and All 3/4-Ton
Trucks
1. Jack
up the car, place on car horse or stand jack, and remove wheel and brake
drum. |
|||
 |
|||
|
Fig. 16—Installing Brake Wheel Cylinder
Clamp |
|||
 |
|||
|
Fig- 17—Removing Brake Shoe Retracting
Spring |
|||
|
|
|||