1942 - 1947 CHEVROLET SHOP MANUAL
Section 5 - Brakes
|
|
|||
|
5-9 |
|||
|
|
|||
 |
 |
||
|
|
|||
|
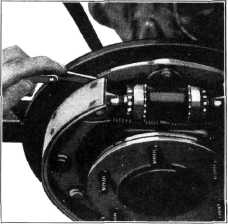
Fig. 20—Checking Alignment of Brake Shoes with Flange
Plate |
|||
|
|
|||
|
MAIN CYLINDER
OVERHAUL
Disassembly
1. Remove the end plug and valve seat
washer.
2. Remove the valve seat washer from the
button on the end plug. Fig.
23.
3. Remove the valve assembly and
spring.
4. Remove the main cylinder
boot. |
5. Remove the pedal stop snap ring with a screw
driver and remove the pedal
stop and push rod assembly.
6. Remove the piston with the secondary
cup.
7. Remove the primary cup.
After all
parts have been removed from the main
cylinder, they should be washed in CLEAN ALCOHOL. Special care should be taken to
make sure that the compensating port in the main cylinder housing, and the bleeder holes of the
piston are clean. BEFORE
WASHING PARTS. HANDS MUST BE
CLEAN. DO NOT WASH HANDS IN
GASOLINE OR OIL BEFORE CLEANING HYDRAULIC BRAKE CYLINDER PARTS, USE SOAP AND WATER TO CLEAN
HANDS.
Inspection
Inspect
the cylinder bore to make sure it is smooth.
Inspect
primary and secondary cups, valve and valve seat for damage or swelling. Replace
when necessary. Swelling of the
rubber parts is due to the use
of improper brake fluid, or the washing of the parts in gasoline, or
kerosene.
NOTE—The primary cup of the
main cylinder has a brass support ring vulcanized in its base to prevent
the primary cup from imbedding in the bleeder holes during braking
action.
Check
piston fit in the cylinder bore, Fig. 24. The clearance between the piston and wall
of the cylinder should be from
1 to 5 thousandths of an inch. |
||
 |
|||
|
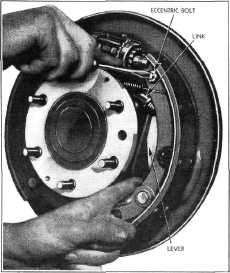
Fig. 21—Adjusting Rear Brake
Toggle |
|||
|
|
|||