1942 - 1947 CHEVROLET SHOP MANUAL
Section 5 - Brakes
|
|
|||
|
5-11 |
|||
|
|
|||
 |
|||
|
|
|||
|
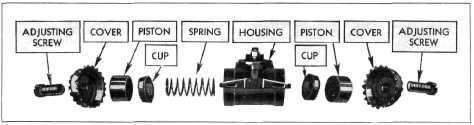
Fig. 26-WheeI Cylinder Parts Layout |
|||
|
|
|||
|
1. Dip a new check valve seat washer in genuine
hydraulic brake fluid, and
assemble over the button on the
end of the end plug. Fig. 23. Assemble a new gasket over the end plug and
screw the end plug, valve seat
washer and gasket into the main
cylinder housing. Tighten the nut securely.
2. Inspect the valve seat washer through the
push rod end of the housing to
make sure the washer is
properly seated.
3. Dip the rubber cups and valves in hydraulic
brake
fluid.
4. Install the valve assembly from the push rod
end of the main
cylinder.
5. Install piston spring.
6. Place the primary cup in the housing, with
the cupped side against the spring.
7. Assemble secondary cup to the piston and
install assembly to the
housing so that the bleeder
hole end of the piston will be against the flat side of the primary
cup.
8. Install the pedal stop and push rod
assembly and lock in place
with the snap ring,
9. Install the rubber pedal stop and push rod
boot, making sure this seal is
tight on the housing. This
seal must be tight to keep water and other foreign matter from entering the
main cylinder through the pedal
stop. |
10. After
the main cylinder has been assembled to the chassis, it must be filled with
genuine G. M. Super No. 9
hydraulic brake fluid, and all pipe lines at each wheel cylinder
bled.
WHEEL CYLINDER OVERHAUL
Removal
In order to
remove a hydraulic brake wheel cylinder the car must be jacked up. the
wheel and brake drum removed,
the brake system wheel cylinder pipe or hose disconnected at the
wheel, and the brake shoe
retracting spring disconnected from the brake shoes. Two cap screws which
hold the cylinder to the brake flange plate must be removed before the cylinder can be taken
from the flange
plate.
Disassembly
1. Remove the cylinder adjusting
covers.
2. Remove the pistons, rubber cups and
spring.
3. Wash all parts in CLEAN ALCOHOL. WASH YOUR
HANDS BEFORE WASHING THE PARTS
IN ALCOHOL. HANDS MUST BE CLEAN. |
||
 |
|||
 |
|||
|
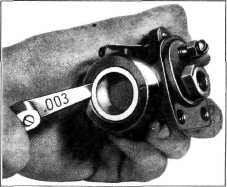
Fig. 25—Checking Edge of Primary
Cup Clearance with Center of Compensating Port |
|||
|
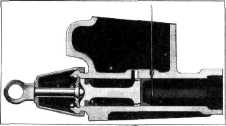
Fig. 27-Checking Whe»l Cylinder Piston
Fit |
|||
|
|
|||