1942 - 1947 CHEVROLET SHOP MANUAL
Section 6 - Engine
|
|
||||
|
6-38 |
||||
|
|
||||
|
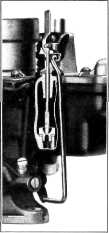
Turn the cover right-side up and
check the low position of the float by measuring from the underside
of the cover to the top of the float at the opposite end from the needle
valve. This distance should be exactly 1". Adjustment may be made by
bending the two stops on the float with a small pair of
pliers.
Metering Rod
The metering rod, which controls
the amount of gasoline passing through the jet, can be changed to meet the
various climatic, gasoline or driving conditions
encountered. |
 |
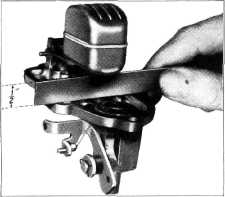
3. Install metering rod gauge (part number 600996) by threading it through the bowl cover and making sure that it seats in the metering rod jet. Fig. 79.
4. Press down on the pump arm until the metering rod pivot pin rests firmly on the top of the gauge, Fig. 79. With the pump arm in this position and the throttle valve fully closed, bend the throttle connector rod at the throttle
|
||
 |
||||
|
Fig. 79—Checking Throttle
Connector Rod with Metering Red Gauge |
valve end as necessary so
the end of |
|||
|
the connector rod
will enter the hole in the
throttle lever freely.
5. Remove metering rod gauge,
assemble metering rod and install the hairpin lock on the throttle
lever end of the connector rod. Turn the throttle stop screw in until the
throttle just starts to open.
CARBURETOR
DISASSEMBLY
The following instructions cover
the overhaul and repair operations for the downdraft
carburetor.
1. Remove the dust cover from the carburetor
bowl.
2. With the throttle valve in the open
position, remove the stamped retainer from the pump arm end of the throttle connector rod, by
pushing in on the retainer and turning it 90 degrees. Then remove the anti-rattle
spring.
3. Disconnect the metering rod spring and
remove the metering rod,
taking care not to bend the
rod.
4. Remove the spring hairpin retainer from the
accelerator pump connector
link and remove the
link.
5. Remove the four bowl cover screws and
remove the bowl cover.
Then disassemble the
float and needle valve from the
cover.
6. Remove the accelerating pump plunger,
plunger spring and metering rod
jet. |
||||
|
Fig. 78 —Checking Carburetor Float Level
These various sizes are available
through the parts warehouses and are marked with their size below the eye
of the metering rod.
The metering rods are marked as follows:
Standard ....................67-46
Lean ..............68-49
Whenever a new metering rod is to
be installed or the old metering rod has been removed from the carburetor,
the metering rod gauge should be used to check to be sure the position of
the throttle valve and the metering rod are in correct relation with each
other. This gauge, Part No. 600996, can be purchased from any one of
Chevrolet's zone warehouses.
To properly synchronize the
metering rod with the throttle valve, proceed as follows, Fig.
79.
1. Remove the metering rod and disconnect the
connector rod from the lower
end or throttle lever.
2. Back off throttle stop screw until the
throttle valve is closed
tightly. |
||||
|
|
||||