1942 - 1947 CHEVROLET SHOP MANUAL
Section 6 - Engine
|
|
|||
|
6-48 |
|||
|
|
|||
|
3. Disconnect wiring harness from clips—one on
each side of the radiator
support, and three across rear
face of core top tank. Pull wiring harness back toward engine out of the
way.
4. Remove the four (4) bolts attaching the
core band to the support—two
on each side, top and bottom.
Remove air cleaner from carburetor (to permit laying the core straight back
horizontally).
5. Move the fan blade so the wide spacing
between blades is at the
sides, to prevent interference at the core outlet connection when
removing the core. Grasp
the core at the top tank and
lift straight up until the outlet connection contacts the support cross brace, then lay
the core straight back
horizontally to thread the outlet connection past the cross brace, Fig.
101.
Installation of the
core is the reverse of the foregoing procedure.
1-1/2-Ton Truck Radiator Core
Removal |
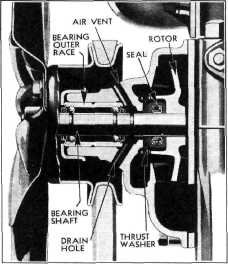
The ends
of the bearing are sealed to retain the lubricant and prevent dust and dirt
entering.
The shaft
and bearing are retained in the housing by a metal cap which is a press fit on
the housing. The thrust
washer has two lugs which fit into two slots in the end of the rotor. One side
of the thrust washer bears
against the ground thrust surface of the pump housing and the other
against the seal. The rubber
seal bears against the machined surface on the inside of the rotor
and also against the thrust
washer. A coil spring mounted inside, and an integral part of the seal,
maintains a constant pressure
against the thrust washer and rotor, assuring a positive seal. An air
vent in the top of the housing
and drain holes in the bottom prevent any water seepage past the thrust
washer entering the
bearing. |
||
 |
|||
|
1. Raise the hood and hold it in the up
position
by its brace.
2. Remove the two bolts attaching the radiator
brace to the radiator support,
then loosen the brace rod nuts
at the dash. Raise the brace rod when core is lifted
out.
Drain the cooling system and
remove all hose connections.
Remove the
four bolts attaching the fan to the water pump pulley, remove the
fan.
Remove the headlamp wiring from the clips
along the top of the
radiator.
Remove the
bolts attaching the radiator core to
the support. These bolts are located at the sides of the radiator just inside the fender
skirt.
Push the
fan shroud to one side and thread it past the bolt attaching the radiator support
brace, then lift it
upward.
The
radiator core may now be removed in exactly the same manner as the fan
shroud.
Replacement
of the radiator core is the reverse of the removal
operations.
WATER PUMP
Construction
The water
pump. Fig. 102, is the ball bearing type and requires no care other than to
make certain the air-vent
in the top of the housing and the drain holes in the bottom do not become
plugged with dirt or
grease.
The shaft
and the double-row ball bearing are integral. The bearings are packed with a
special high-melting point grease at the time of manufacture and require no further
lubrication. |
|||
|
Fig. 102—Cross-Section of Ball Bearing Water Pump
The water
pump itself is not interchangeable with previous models other than 1941, due
to the fact that it has two
water outlets and is 1/4" longer than models prior to
1941.
FAN
The four-blade fan is bolted
directly to the water pump pulley,
which is driven by the crankshaft pulley by means of a "V" type endless fan
belt. The spacing of the fan blades is based on the well known
harmonic principle and reduces noise to a minimum. These two pairs of
blades set up vibrations of different frequencies, each canceling or
dampening out the
other. |
|||
|
|
|||