1942 - 1947 CHEVROLET SHOP MANUAL
Section 1 Body
|
|
|||
|
1-11
|
|||
|
|
|||
|
the door lock pillar and mark the handle shaft
at the point where the hole should
be drilled.
3. Remove handle, clamp in vise and drill a 3/16"
hole through the center of the
shaft at the point where
punch marked.
The handle is now ready for installation in the
door.
Door Handle Ferrule
The door outside handle ferrules are rubber-covered
on the outer circumference to provide
insulation between the door panel
and the shank of the door
handle. Since the inside diameter of the
ferrule is held to very close
limits, care must be used when replacing one to prevent
distortion of this inner surface
which would result in the handle "binding."
Removal
1. Remove
the door handle. Free the body belt
molding from its clips.
2. Using
a screwdriver or similar thin-bladed tool
under the molding and edge of the
ferrule, pry the ferrule out of the door. In extreme cases it
may be necessary to use a hacksaw
blade to cut through one
side of the ferrule, then collapse
it to remove.
Installation
|
3. Push
the ferrule on the tool through the belt
molding into the hole in the door
until the ferrule seats
against the belt molding, Fig. 21.
Then turn the tee handle on the
installing tool until it
flares the inner end of the ferrule up
behind the grommet.
4. Back
off on the tee handle and remove the
installing tool. Reassemble door
handle and check to be
sure it turns freely.
DOOR LOCK
Removal
1. Raise
the door glass to the fully closed position.
Remove the door window garnish molding
and door trim pad.
2. Remove
door outside handle and on front doors only remove the door safety
lock.
3.
Remove the door inner
panel hole cover plates.
|
||
 |
|||
|
1. Reassemble
the body belt molding, making sure
the ferrule or door handle hole is
lined up with hole in the
door panel.
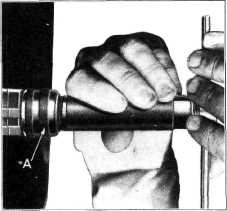
2. Place a new
ferrule on the installing tool B-223.
Fig. 21, and adjust the collar "A"
until the end of the
ferrule is flush with the jaws of the tool.
|
|||
 |
|||
|
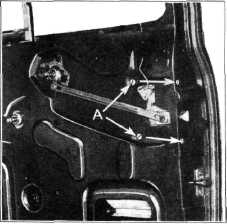
Fig. 22 -Door Lock Retaining Screws
4. Remove
the screws holding the remote control
mechanism to the door inner panel,
shown in Fig. 22. Remove
remote control link at door
lock end.
5. Remove
the four screws "A" holding the door
lock assembly to the door. Fig.
22, and remove the lock
assembly through the hole in the door
inner panel.
Replacement operations are the reverse of the
foregoing.
DOOR SAFETY LOCK
Removal
1. Release the door weatherstrip on the door lock
pillar facing, at a point just
below the lock striker.
|
|||
|
Fig. 21-Installing Door Handle Ferrule
|
|||
|
|
|||