1942 - 1947 CHEVROLET SHOP MANUAL
Section 1 Body
|
|
|||
|
1 - 1 0
|
|||
|
|
|||
 |
 |
||
|
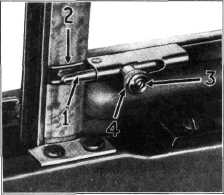
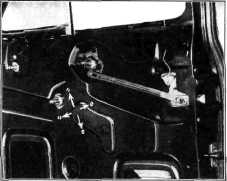
Fig. 20- Door Window Regulator Attachment
4. Remove
door division channel lower adjusting
screw (on front doors).
5. Remove
the screws holding the regulator assembly
to the door inner panel, Fig. 20.
6. Toward
the lock pillar side of the door inner
panel remove the two screws
holding the regulator guide plate to the inside of the door inner
panel.
7. Push
the regulator assembly into the door so the shaft is clear of
the inner panel, then remove the
assembly through the opening in the inner panel.
Replacement operations
are the reverse of the foregoing.
Door Outside Handles
The door outside handle is held in the door lock
by a safety screw inserted
through the shaft section
of the handle and into the lock. A hole in the door
lock pillar, shown in Fig. 20 at
the raised area of the
pillar metal just above the lock bolt, provides
access to the screw for removal.
To remove the handle, turn it as necessary to
expose the head of the screw at
the hole in the pillar,
then, using a narrow blade screwdriver, remove
the screw and pull the handle out of the
door. Reassembly is just the
reverse of this procedure.
New handles out of parts stock do not have the
hole in the shaft for the safety
screw. To install a new
handle from parts stock use the following
procedure.
1.
Insert and locate new handle to
proper position in
door-base of handle should be firmly against
body belt molding and ferrule.
2. While
holding handle in above position, use a center punch through the
safety screw hole in
|
|||
|
Fig. 19-Ventilator Safety Lock Parts
All parts of this lock are serviced and may be
obtained separately with
exception of the housing riveted to the frame. The following is
a list of the lock parts which may be identified by the numbers
shown in Fig. 19.
1-Ventilator Lock Bolt. 2-Division
Channel Bearing Plate. 3-Ventilator Locking Knob Screw.
4-Ventilator Locking Knob.
Ventilator Locking Knob Spring (not
shown).
Ventilator Rain Deflector
The ventilator rain deflector unit on each front
door just above the ventilator
assembly is held to the
inner flange of the window opening reveal by
screws.
Removal
1.
Remove the door window
garnish molding.
2. Turn
the ventilator glass to the fully open
position.
3. Turn
down or loosen the ventilator rubber
weatherstrip directly above the
ventilator sufficient to
expose the rain deflector screws.
4. Remove
the screws and rain deflector.
Replacement operations are the
reverse of the
foregoing.
DOOR WINDOW REGULATOR
Removal
1. Raise
the window to the fully closed position.
Remove door window garnish
molding. Remove door trim
pad.
2.
Remove the door inner
panel hole cover plates.
3. Remove
the door glass as described under door
glass removal.
|
|||
|
|
|||