1942 - 1947 CHEVROLET SHOP MANUAL
Section 2 - Frame
|
|
|||
|
2-12 |
|||
|
|
|||
|
apt to
become worn, causing oil leaks around the shaft. Such leaks can be
corrected only by replacing the
shock absorbers.
BROKEN OR INOPERATIVE SHOCK
ABSORBERS
Broken or
inoperative shock absorbers can readily be detected by lack of shock absorber
resistance or too much
resistance. Resistance may be checked as outlined under "To Check for
Fluid." Too much resistance may be caused by broken internal parts,
clogged valves or stuck pistons. No resistance may indicate lack of fluid, dirt holding valve
open, broken cam or other broken internal parts. Shock absorber may
be empty or low on fluid. Look for broken internal parts. Look for broken or
cracked shock absorber body. Broken or inoperative shock absorbers should be repaired or
replaced.
TO LOCATE SHOCK ABSORBER
NOISE
When noise blamed on shock
absorbers is encountered, there
are many points to be checked to determine the exact cause of the
noise.
Check for
worn or broken links or bushings; shock absorbers empty or low on fluid;
stabilizer links and bushings: hand brake parts; loose tools in car; broken internal shock absorber
parts; car spring shackles or
covers; loose sheet metal parts; loose bumpers; loose shock absorber
mounting, etc. All these can cause noise for which the shock
absorbers are sometimes blamed. If noise is definitely determined to be caused by shock absorber,
and cannot be corrected by external service, the unit should be removed for repair or
replacement. |
TO FILL WITH FLUID
ONLY
1. Clean the shock absorber thoroughly using a
stiff bristle brush and
kerosene for the purpose.
2. With fluid injector, J-1026, fill shock
absorber with G.M. Shock Insulating Fluid according to following instruction.
To Fill Single-Acting Shock Absorbers
1. (a) If shock absorber is equipped with a
filler
plug as
shown in Fig. 6, remove plug and fill
shock absorber to capacity.
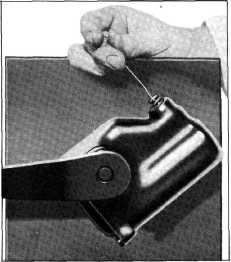
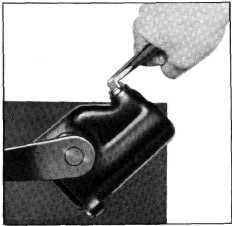
(b) If
shock absorber is not equipped with a filler plug, tilt unit to an angle of about
45° with arm end down. Remove
valve nut with a heavy
screwdriver, preferably of the offset type, Fig. 17. Remove relief valve,
using & small
hooked tool or bent wire as shown in Fig. 18. Fill shock absorber to
capacity.
2. Replace filler plug, or relief valve and
nut. |
||
 |
|||
 |
|||
|
Fig. 18—Removing Shock Aborber Relief
Valve
3. Move arm up and down vigorously several
times to work the fluid into
the cylinder.
4. Remove plug or valve and add additional
fluid to fill reservoir to capacity if necessary.
5. Withdraw a quantity of fluid
equivalent to
about two
tablespoonfuls. 6. Replace filler
plug, or valve and nut, using a
new gasket. |
|||
|
Fig. 17-Removing Shock Absorber Filler
Plug |
|||
|
|
|||