1942 - 1947 CHEVROLET SHOP MANUAL
Section 6 - Engine
|
|
|||
|
6-27 |
|||
|
|
|||
|
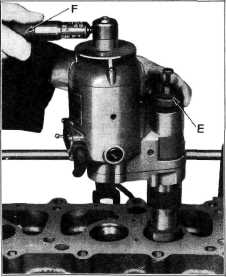
Place the grinder over the
expanding pilot, then loosen the Allen
set screw "B," Fig. 58, and push down the adjusting rod "C" against the
top of the pilot. Then lock the
set screw "B" tightly. |
into the
valve seat by turning the feed screw "E" to the left one notch at a time until the
wheel is grinding all around the face of the valve seat.
Before shutting off the
grinder, stop feeding the wheel into the valve seat and give it time to
grind itself free. Turn off the switch and allow the grinder to
stop before lifting it from the
pilot.
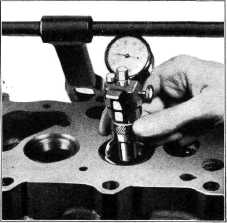
Mount the
valve seat dial indicator on the pilot, set at zero and turn the sleeve of
the indicator with thumb
and finger. When the seat is properly ground, the indicator reading will
be within .001", Fig.
60.
The valve
seats should now be narrowed down to
the proper width which is 3/64" to 1/16" for the intake valve seats and 1/16" to 3/32"
for exhaust valve seats.
This operation is done by machining both the port and the top of the valve
seat. A 70-degree grinding
wheel should be used in the intake and exhaust ports, and a 20-degree grinding
wheel to thin down the exhaust
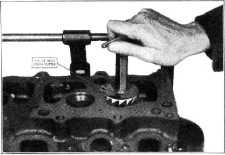
seats from the top. A form cutter, KMO-105-7, must be used to thin
down the intake valve scats
from the top, Fig. 61. This tool, at the same time, machines the
edge of |
||
 |
|||
 |
|||
|
Fig. 59—Grinding Intake Valve Seat in Head
Turn the
feed screw "E," Fig. 59, to the right until the grinding wheel just clears the
seat. Balance the grinder
with the compensating handle "F." Start the motor and feed the grinding
wheel |
|||
 |
|||
|
Fig. 41—Using Cutter to Narrow Intake Valve Seat
the valve
recess in the head, thereby smoothing this passage for the free flow of the
incoming gases.
Good judgment must be used when
narrowing a valve seat to make sure
the seat contacts the center of the valve face. This is very
important because the life of a valve reconditioning job
depends to a great extent upon the
width of the valve seat and
point of seat contact with the valve face.
If the
valve seat in the head is too narrow, heat will not be dissipated from the valve head
fast enough. If too wide,
carbon particles can be readily caught between the valve face and seat,
causing the valve to hold open
and blowby, which will soon
burn both the valve and the seat in the head.
Refacing Valves
Valves
that are pitted can be refaced to the proper angle, insuring correct relation
between the head and stem, on
a valve refacing machine illustrated in Fig. 62. |
|||
|
Fig. 60—Checking Valve Seat with
Indicator |
|||
|
|
|||