1942 - 1947 CHEVROLET SHOP MANUAL
Section 6 - Engine
|
|
|||
|
6-28 |
|||
|
|
|||
|
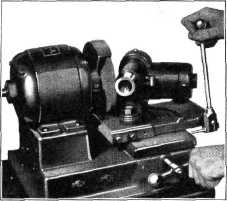
The grinding
wheel on the valve refacing machine
should be properly dressed to make sure it is true and smooth. The
valve stem is then clamped in the
chuck of the machine and the chuck set at a 30 degree angle. The beveled
face of the valve head is then
passed across the face of |
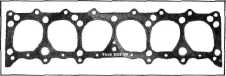
CAUTION—The cylinder head
gasket must be installed with the side marked "This side up" on top, Fig.
63, so all water passage holes and cylinder head bolt holes will line up
properly. |
||
 |
|||
 |
|||
|
Fig. 63-Cylinder Head Gasket
To
properly align the cylinder head to the cylinder block and keep the
cylinder head gasket in place to
prevent damage, the two cylinder head guide pins should be used.
They screw into the cylinder block at
the front and rear holes on the manifold side and guide the head into
position.
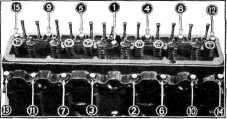
After the
head has been properly aligned, insert and tighten the cylinder head bolts with a
wrench, tightening each one
evenly a little at a time in the order shown in the cylinder head bolt
tightening diagram, Fig. 64.
The order or sequence in which |
|||
|
|
|||
|
Fig. 62—Valve Refacing Machine
the
grinding wheel until this surface is true and smooth all around the valve. Care should be
taken while grinding not to remove too much stock from the face of the valve. This is important to
prevent burning of valves in
operation.
For quiet
operation, it is important that the end of each valve stem be free from pits.
The valve should be placed in the "V" block on the refacing machine, and the end of the valve stem
ground until it is true and
smooth.
To test for
perfect valve and seat contact, mark lines with a lead pencil about 1/4" apart
on the face of the valve and
replace the valve in the head.
Give the
valve one-half turn to the right and one-half turn to the left, using a
little extra pressure on the
valve. If all pencil marks are removed, as a result of the face contacting the seat,
the grinding is perfect. If, on the other hand, one line or part of one remains untouched, this
indicates an uneven spot, and
the valve must be refaced until it seats properly.
Before replacing the valves in the
cylinder head, clean the valves and
the cylinder head. A good valve
job is frequently ruined by failure to properly clean all of
the parts,
INSTALLING CYLINDER HEAD ASSEMBLY
The best
practice is to install a new cylinder head gasket each time the cylinder
head is removed and reassembled
to the block. |
 |
||
|
Fig. 64—Cylinder Head Bolt Tightening Diagram
the bolts
are tightened is important, since many water leaks between cylinders are caused by
improper tightening of cylinder head bolts.
When a tension wrench is used to
secure uniform tension on all bolts,
the recommended tension is from 75 to 80 foot pounds.
VALVE ADJUSTMENT PROCEDURE
Before
adjusting the valve-stem-to-rocker-arm clearance, it is extremely important that
the engine be thoroughly warmed up to normalize the expansion of all
parts and stabilize the oil temperature. This is very important because during the
warm-up period, the valve
clearance will change considerably. To adjust the valves during
this warm-up period will
produce clearances far from correct after the engine reaches normal
operating temperature. |
|||
|
|
|||