|
1949 Delco Brakes Service Manual (Courtesy of Pat Gizz) |
|||
|
DELCO BRAKE SERVICE MANUAL |
|||
|
|
|||
|
(behind the primary cup) and past
the lip of the primary cup. Any excess is bypassed through port "A" (See Figure 2) into the reservoir. Thus,
we have a cylinder full of fluid for the next brake
application. "Pumping the brake pedal" thus feeds additional fluid into the operating
system.
The primary cup must be clear of
the compensating port "A" (See Figure 2) when the brake pedal is
fully released and the piston and push rod are at their "off" position;
otherwise, the compensating feature of the master cylinder will be
destroyed and the brakes will drag. This can be determined by making sure
that there is a slight amount (approx. 1/2 inch) of free movement
of the brake pedal before the
pressure stroke starts.
If, at any time, it is found
necessary to service any of the component parts of the master cylinder, it
is more often advantageous to remove the master cylinder from the car.
However, fluid can be added to the system without removal of the unit by
carefully cleaning the area around the filler cap assembly and
then removing it.
MASTER CYLINDER DETAILED
SERVICE INSTRUCTIONS
Never
remove filler cap (or cover plate) until it is perfectly clean. No dirt must EVER
get into the fluid
reservoir.
Never wash cylinders or parts
in gasoline, kero- |
sene, or any mineral base oil.
Always use Declene or a good grade of clean alcohol for cleaning parts. Be
sure to dip all parts in clean Delco Brake Fluid before
assembling.
Disconnect fluid line and clevis.
Remove the cylinder. Remove head nut (using proper wrenches). Wash
the inside and outside of the cylinder and all parts with Declene. If cylinder bore is
rough due to deposits or corrosion, clean with crocus cloth or fine
wire brush. Then wash thoroughly to remove all traces of grit or metal particles. If
badly scratched or pitted, replace with a new Delco Brake Master
Cylinder Assembly.
Rubber cups, check valve seat,
and all internal parts should be
carefully inspected. If any parts are damaged or worn, or if rubber
cups are swollen, or have taken a set, replace with new Delco Brake parts.
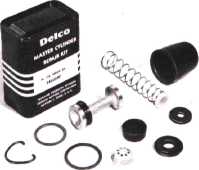
Delco Master Cylinder Repair Kits contain all necessary parts for this type of repair.
(See Figure 5.) |
||
 |
|||
 |
|||
|
Fig. 5—Delco Hydraulic Brake
Matter Cylinder Repair Kit
Before assembling a master
cylinder be certain that the parts are not plugged up with dirt or gum. To
check these, illuminate the cylinder bore and look through the filler cap hole in the
reservoir. If no light shines
through, the holes are plugged up. Wash and blow them out. Do not
push a wire through these holes as it will raise burrs in the cylinder
bore.
When assembling a master
cylinder, always assemble the head nut with a new copper gasket
first, then assemble the check valve and spring assembly, primary cup,
piston assembly and push rod. This procedure will prevent the check valve
from being pinched under the head
nut. |
|||
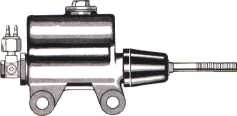
|
Fig. 4B—Delco Hydraulic Brake Master
Cylinder |
|||
 |
|||
|
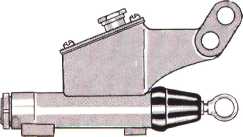
Fig. 4C—Delco Hydraulic Brake Matter
Cylinder |
|||
|
|
|||
|
5 |
|||
|
|
|||