|
1949 Delco Brakes Service Manual (Courtesy of Pat Gizz)
|
|||
|
DELCO BRAKE
SERVICE
MANUAL
|
|||
|
|
|||
 |
from drum
sufficiently to seat the primary shoe solid against the opposite side
of the drum. Turn adjusting screw to obtain .015 clearance between
drum and each end of secondary shoe. Solid contact of primary shoe
against drum must be maintained
during this adjustment. (See Note under 7 above for
indications of excessive lining wear.)
9. Connect and check
parking brake, observing when using same if rear brakes are uniform.
If they are not, loosen adjusting screw on tightest brake not over
two notches. If more than two notches are required, make brake cable
adjustment.
10. Replace the
adjusting screw hole covers carefully
and road-test the car.
|
||
 |
|||
|
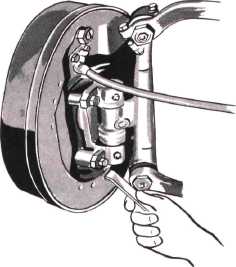
Fig. 18—Use of
Shoe Adjusting Tool
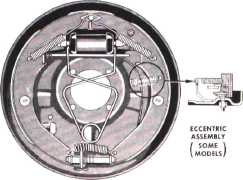
ADJUSTING SHOES ON MODELS NOT USING ECCENTRIC
8. Insert screw
driver between lining of secondary
shoe and drum. Pry shoe assembly away
|
|||
|
Fig. 19—Delco Brake Lube
|
|||
|
|
|||
|
MAJOR BRAKE
ADJUSTMENT
|
|||
|
|
|||
|
("Covers adjustment
of brakes including resetting of anchor pins.)
1.
Jack up all wheels in safe manner.
Remove wheels and
brake drums installing Wheel Cylinder Clamps (See Figure 20). The 1939
through 1949 cars have piston stops in the backing plate and it is not
necessary to use wheel cylinder clamps. Check and make certain there
is approximately 1/2" clearance between the brake pedal arm
and underneath side of toe board or pedal stop. (See "Brake Pedal
Adjustment," Page 18.)
2.
Add sufficient fluid to master
cylinder reservoir to
bring the fluid level up to approximately
1/2" below the top of the filler plug
opening. (Note: See "Brake
Fluid," Page 10.)
3.
Check brake system for leaks at
master cylinder, connections, hose lines, wheel cylinders,
and stop light switch. If any of
the above parts
|
leak, repair,
replace, or tighten sufficiently to stop leaks. Blow out all dust and
dirt from around brake mechanism in each wheel. Lubricate with Delco
Brake Lube points where shoes
indicate rubbing on brake backing plate. Re-
|
||
 |
|||
|
Fig. 20—Wheel Cylinder Clamp Installed
|
|||
|
|
|||
|
14
|
|||
|
|
|||