|
1949 Delco Brakes Service Manual (Courtesy of Pat Gizz) |
|||
|
DELCO BRAKE SERVICE MANUAL |
|||
|
|
|||
|
move clamps, replace wheels and
properly adjust front wheel bearings.
4. Disconnect parking brake cables at front
end.
PERFORM FOLLOWING OPERATIONS
AT ALL FOUR WHEELS. (See Special Instructions below for 1949
Buick).
5. Insert a .010" feeler gauge between the
lining and the drum about
1-1/2" from the adjusting screw end of the secondary (rear)
shoe lining on all 1936, 1937,
1938 models, and on Pontiac 1942 through 1948 models. Loosen the
eccentric lock nut slightly
(See Figure 17) and turn the eccentric in the direction the wheel revolves
as the car moves forward until
a .010" feeler gauge is
snug.
6. Insert a .010" feeler gauge about 1-1/2"
from anchor pin end
of the secondary shoe lining between the lining and drum (See Figure
16). This clearance should be
slightly less than at the
adjusting screw end of secondary shoe lining. If the clearance is not satisfactory,
adjust the anchor pin as
directed below to correct clearance while at the same time
readjusting the eccentric to
maintain .010" at the adjusting end of the secondary
shoe.
NOTE: If the clearance at the
anchor pin end of the secondary shoe is too great, turn the anchor pin in
the direction the wheel turns for forward car movement; if too little,
adjust anchor pin in opposite direction. (The preceding information
applies to the eccentric type anchor pin and those not eccentric require
only tapping lightly with a hammer in required direction after the
lock nut has been loosened.) Holding anchor pin (eccentric type only),
tighten the anchor pin nut as tightly as possible using box socket
wrench. After tightening the anchor pin nut, recheck the clearances and
then tighten the eccentric lock nut, being sure to keep eccentric from
turning.
7. For completion of adjustments see
paragraphs 5-10 under "Minor
Brake Adjustment."
SPECIAL INSTRUCTIONS—1949 BUICK
Starting
approximately September 1, 1948, the feeler gauge hole in the Buick brake drums was
removed. Following are new instructions for centralizing the brake shoes and setting the
anchor pins. This method will
have to be used on cars not equipped with feeler gauge
hole: |
 |
||
|
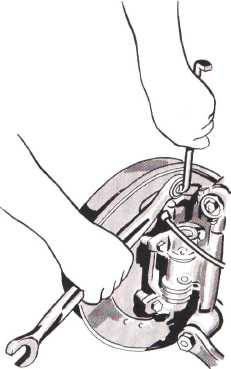
Fig. 21—Anchor Pin Adjustment
1. Loosen anchor pin nut just enough so that
pin can shift in slotted hole
in backing plate. If nut is
loosened too much, the anchor pin will tilt due to pull of brake shoe
springs.
2. Using Adjusting Tool (See Figure 18), turn
brake adjusting screw to expand
brake shoes until wheel can just
be turned with two hands.
3. Tap anchor pin lightly to make sure it
centers in the ends of brake
shoes while they are centered in the drum, then tighten anchor pin
nut securely.
4. Tightening the anchor pin nut should not
change the two hand drag
previously obtained. If it does, repeat the procedure without
loosening anchor pin nut
quite as much.
5. After centralizing brake shoes and anchor
pins at all four wheels, check
to make sure that an equal two
hand drag exists at each wheel, as near as possible. |
|||
|
|
|||
|
15 |
|||
|
|
|||