|
1949 Delco Brakes Service Manual (Courtesy of Pat Gizz) |
|||
|
DELCO BRAKE SERVICE MANUAL |
|||
|
|
|||
|
DRUMS
All drums should be checked with
a straight edge to be certain they are flat and square with the shoes. If
not, they should be turned or ground to car fac- |
tory recommendations. Out of
round drums can be checked on the car before removing by expanding the
shoes and noting the difference in drag of the drum at various locations
on the shoes. (See Operation 2 under "Brake Reconditioning," Page
17.) |
||
|
|
|||
|
CHEVROLET BRAKE
ADJUSTMENT |
|||
|
|
|||
 |
to the
main cylinder push rod in the proper direction to secure 1/4" toe-board
clearance— measurement being
taken between pedal arm and underside of toe-pan. 3. Tighten the check nut against the
clevis.
BRAKE SHOE ADJUSTMENT
PASSENGER CARS, 1/2 AND 3/4-TON TRUCKS
1. Raise the car and place stand jacks front
and rear so that all four
wheels rotate freely.
2. Disconnect the emergency brake cables at
the idler lever. This precaution should be taken to eliminate the possibility of the brake
shoes dragging the drum due to
misadjustment of the emergency
brakes. |
||
 |
|||
|
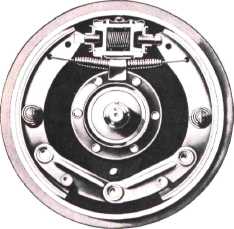
Fig. 25—Chevrolet Passenger
Car Front Brake Assembly
Chevrolet hydraulic brakes can be
adjusted without the removal of the wheels as all brake flange plates have
openings with spring snap covers to simplify brake
adjustment.
Toe-board clearance very seldom
needs to be adjusted. The pedal stop, located in the brake main cylinder, is permanent. Before attempting to
adjust this stop, be certain that the pedal returns to the
full released position freely, with no binding, and that the pedal retracting spring has
not lost its tension.
TOE-BOARD CLEARANCE—PASSENGER CARS
1. Loosen check nut on the eccentric
bolt.
2. Turn the eccentric bolt in the proper
direction to secure 7/16"
toe-board clearance.
3. Tighten check nut.
TOE-BOARD
CLEARANCE—TRUCKS
1. Loosen the check nut on the rear of the
clevis on the main cylinder
push rod.
2. Remove clevis pin and turn the clevis
attached |
|||
|
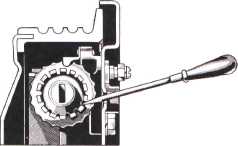
Fig. 26—Chevrolet Passenger
Car Wheel Cylinder Adjustment
3. Remove the adjusting hole covers and insert
a screw driver through the
adjusting hole and engage the
teeth on the adjusting cover of the wheel cylinder (See Figure
26).
Turn the adjusting cover in a
clockwise direction looking at the end of the cylinder, until the shoes cause a slight drag on the brake
drum.
4. When the "drag" condition is reached, tutu
the adjusting cover back, the
opposite direction, four
(4) notches. Repeat this operation on each shoe in each
brake. |
|||
|
|
|||
|
19 |
|||
|
|
|||