|
1949 Delco Brakes Service Manual (Courtesy of Pat Gizz) |
|||
|
DELCO BRAKE SERVICE MANUAL |
|||
|
|
|||
 |
positive stop is felt. While
holding the cable in this position, adjust the check nuts against the
clevis plates. Then tighten the check nuts securely.
BRAKE SHOE REMOVAL PASSENGER,
1/2 AND ALL 3/4-TON TRUCKS
1. Jack up the car, place on car horse or
stand
jack, and remove wheel and
brake drum.
2. Install Chevrolet Type wheel cylinder clamp
to keep the wheel cylinder
pistons in place and prevent
leakage of brake fluid while replacing shoes.
3. Remove brake shoe retracting spring with
special pliers (See Figure
14).
4. Remove conical guide springs (hold down
springs and
pins).
5. Remove brake shoe anchor pin lock and pin.
On rear brakes—remove toggle
lever, eccentric bolt and nut
from the rear brake shoe.
6. Disassemble articulating links from shoes
by removing friction spring
pin locks, pins and springs.
BRAKE SHOE REMOVAL
1-1/2-TON AND C.O.E.
TRUCKS
The removal and replacement of
the brake shoes of the 1-1/2 ton and C.O.E. trucks is identical
with that of the passenger cars except for three slight variations in
the design of the hook-up.
1. It is necessary to remove the wheels and
brake drums with the wheel
hubs to replace brake linings,
necessitating the readjustment of the wheel bearings.
2. The toggle mechanism of the passenger car
emergency brakes at the rear
wheels is replaced on the
trucks by a lever and link assembly. This lever and link assembly is
attached to the rear
brake cable on the outside of
the brake flange plate. The lever on the inside, as it is actuated by
the emergency brake lever to
set the brakes, moves the links outward expanding the brake shoes. Each link has a
support at its outer
end.
3. Each brake shoe of the rear brakes has an
individual anchor
pin.
BRAKE SHOE REPLACEMENT
Procedures for brake shoe
replacements are the |
||
|
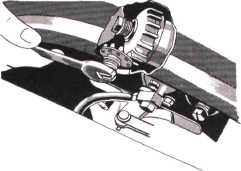
Fig. 27—Chevrolet Truck Wheel
Cylinder Adjustment
BRAKE SHOE ADJUSTMENT
1-1/2-TON AND C.O.E.
TRUCKS
The adjustment of the front
brakes on the 1-1/2-ton and C.O.E. trucks is the same as for passenger
cars with the exception that the wheel cylinder adjusting covers are
backed off five (5) notches instead of four (4).
To adjust
the rear brakes on these trucks use a 5/8" open end wrench to turn the
adjusting pinion.
1. Turn the adjusting pinion in a clockwise
direction until the shoe causes
a slight drag on the brake
drum (See Figure 27).
2. Turn the adjusting pinion back in the
opposite direction 3/4 of a
turn to provide running clearance.
The backing-off of the adjusting
cover, the specified number of notches will be indicated by a faint
click of the cover lock spring as the cover is turned. This backing-off of
the adjusting cover moves the brake shoe away from the drum to insure
proper running clearance of the shoes
in the drum.
EMERGENCY BRAKE
ADJUSTMENT
The
emergency brake adjustment should be checked each time the hydraulic service
brakes are adjusted. When making an emergency brake adjustment the service brakes must be
properly adjusted first as
a base for adjusting the emergency brakes:
1. Set the emergency brake lever in the fully
released
position.
2. Loosen the check nuts at the cable
ends.
3. Pull the cables out of the conduit by hand
until |
|||
|
|
|||
|
20 |
|||
|
|
|||