1942 - 1947 CHEVROLET SHOP MANUAL
Section 12 - Electrical System
|
|
|||
|
12-13
|
|||
|
|
|||
|
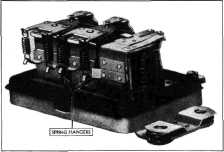
Current setting of the
regulator is adjusted by bending the spiral spring hanger down to
increase the current setting, or bending up on the spring hanger to
decrease spring tension and lower current setting, Fig. 25. Normally,
all adjustments should be made on one spring and the other spring
should not be touched.
|
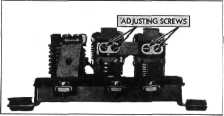
Adjustment of this air
gap may be made by loosening the screws which mount the upper contact
support, two left screws in Fig. 26. The support may then be moved up
or down as required to provide an air gap of .075" to .085".
NOTE -Be sure
points are lined up and tighten screws down well after adjustment.
VOLTAGE REGULATOR
When checking the
voltage regulator, connect the volt ammeter tester to the regulator as
follows:
Remove the battery
wire from the battery terminal of the regulator and connect the
positive lead of the ammeter to the battery terminal and the negative
lead to the battery wire.
Then connect the
positive lead of the voltmeter to the battery terminal of the
regulator and the negative lead to a good ground, Fig. 27. Start the
engine and run it at a speed equivalent to approximately 30 M.P.H.
|
||
 |
|||
|
|
|||
|
Fig. 25-Current Regulator Lower Spring Hangers
If the unit is badly
out of adjustment, it may be necessary to remove one tension spring
and adjust by means of the other tension spring only for its proper
setting. With the generator operating at medium speed, adjust the
tension of the one spring by bending its hanger up or down until the
current regulator unit operates at approximately 17 amperes. Next
install the second spring and complete adjustments entirely on this
spring to 34 to 36 amperes as previously explained without again
touching the first spring. The final adjustment must be made lightly
on the second spring.
In some cases it may
be necessary to readjust the air gap between the armature and core. To
check this adjustment push the armature down all the way by hand, then
allow it to come back up until points are just touching. Then measure
the air gap, which should be from .075" to .085".
|
 |
||
|
Fig. 27-Volt Ammeter Connections for Checking
Voltage Regulator
If the output is less
than 8 amperes, turn on lights to permit increased generator output,
then cut in the resistance on the volt amperage tester by turning the
resistance knob to the right until the output is reduced to 8 to 10
amperes. Operate the generator at this speed for at least 10 minutes
to bring the regulator up to operating temperature. Retard the
generator speed until the circuit breaker points open, then bring
generator back to speed and note voltage setting, which should be from
7.2 to 7.4 volts.
NOTE -When checking
voltage regulator setting the regulator cover must be in place.
|
|||
 |
|||
|
Fig. 26-Air Gap Adjusting Scrawl
|
|||
|
|
|||