1942 - 1947 CHEVROLET SHOP MANUAL
Section 4 - Rear Axle, Universal Joints & Springs
|
|
|||
|
4-20 |
|||
|
|
|||
|
When installing new bearing outer
races, use special driver J-1322 for front race, and J-1321 for rear
race—care should be exercised to press the races squarely and firmly
against their seats.
NOTE—The pinion cage as
serviced through the Parts Warehouse will come with the front and rear
pinion bearing outer races pressed into place.
The double reduction shaft left
bearing cap will be serviced with the outer race in place, because it
requires expensive tools to remove and replace the bearing outer
race.
The ring gear and pinion will be
serviced only in matched sets.
Reassembly
Lubricate the bearing roller
races. Install the rear pinion bearing on the drive pinion, install spacer
on shaft up against bearing. Install pinion, bearing and spacer in the
pinion cage. Then install over the pinion shaft, and up against the front
face of the spacer inside the cage, the same number and thickness shims as
removed. Press the front pinion bearing on the shaft until stopped; this
should produce a slight "drag" when turning the pinion cage. Should
the cage turn too freely, or too hard, remove the front bearing and
add or remove shims as necessary to produce the slight "drag," or proper
adjustment. Shims are available in .021", .024", .030" and .034". After
arriving at proper adjustment of pinion bearings, install
spring-loaded oil seal, with open end of leather to the rear, using a
driver to support front face of seal to prevent damage. Install joint
yoke, washer, nut and cotter pin.
Double Reduction
Shaft—Disassembly
Remove the lock rings from the
bearing nuts. The nut at the end opposite the ring gear should be removed
first, to permit removal of the bearing, low-speed pinion, shifter
sleeve, and detent balls and springs. Then clamp the splined section of
the double reduction shaft in a vise equipped with copper jaws to protect
the teeth, and remove the bearing nut from the ring gear end of the
shaft.
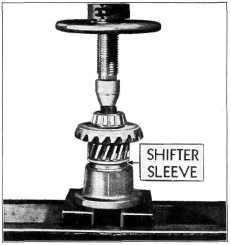
Replace the shifter sleeve on the
shaft, allowing it to bear against the high-speed pinion. With the
assembly resting on the shifter sleeve supported in an arbor press, press
the bearing and ring gear from the shaft. Fig. 38.
Inspection
Clean all parts and inspect the
ring gear and double reduction pinions for cracked or chipped teeth. Check
the fit of the pinions on the shaft and inspect the bearings for damaged
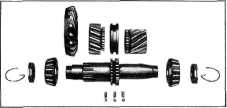
rollers or cracked races. Any damaged parts should be replaced. Fig. 39
shows the parts which make up the double reduction shaft
assembly. |
Reassembly
Before installing the double
reduction pinions on the shaft, their inner bearing surfaces must be
thoroughly lubricated with rear axle lubricant for initial
lubrication. |
||
 |
|||
|
Fig. 38—Removing Double Reduction Shaft Bearing on Ring Gear
End
Install the high-speed double
reduction pinion on the shaft with the spur gear side toward the spur gear
on the shaft. Start the ring gear on the splines. Then press the ring gear
on the shaft. During this operation use a feeler gauge to check the
clearance between the high speed double reduction pinion and the splines
on the shaft; a clearance of .015" to .020" (.015" or near this preferred)
must be allowed between these two parts to prevent scoring and to
allow proper shifter sleeve travel. Fig. 40. This clearance is controlled
by how far the ring gear is pressed on the shaft. |
|||
 |
|||
|
Fig 39—Layout of Double Reduction Shaft Assembly
Start the roller bearing on the
shaft, and, using a sleeve over the shaft and against the bearing inner
race, press the bearing solidly against the ring
gear. |
|||
|
|
|||