1942 - 1947 CHEVROLET SHOP MANUAL
Section 10 - Wheels & Tires
|
|
|||||
|
10-7
|
|||||
|
|
|||||
|
CAUTION-Do not
disturb the leveling plate during this operation.
With the indicator
hub still raised, it will be
found that the little brass pin which actuates the
|
the scale. After the
amount of weight has been
determined, it must be remembered that one-half
of the required weight is placed
on the underside of the rim
and the other one-half of the weight
placed 180° away (opposite) and on
the upper side of the rim. Correcting weights must be accurately
divided in order to retain the static balance of the
assembly.
Place one-half the amount of weight needed at
the chalked position on the lower
side of the rim. Place
exactly the same amount of weight directly
opposite (180°) the chalk mark,
but on the upper side of
the rim. Be sure the weights are tapped on
securely as the tire bead rusted
to the rim sometimes prevents complete contact.
In order to make sure that the wheel is in perfect
dynamic balance, recheck for accuracy in accordance with the
procedure outlined above. Should
the pointer indicate that the wheel is still
unbalanced, it is evident that
incorrect weight was used
to balance the wheel. If the pointer is at the
extreme low position directly
below the lower weight, it
indicates that too much weight was used. Should the pointer be at the
high position directly
under the lower weight, it indicates insufficient
weight. Should any changes in
weight be found necessary,
it is suggested that the wheel again be
rechecked for accuracy after
corrections have been made.
There may be some cases where it is necessary
to statically balance rear wheels
to correct a hopping
condition at the rear end. To do this, the rear wheels may be adapted
to the static arbor by use of face plates, or used in
conjunction with a perfectly
balanced front wheel hub and brake
drum assembly.
|
||||
 |
|||||
|
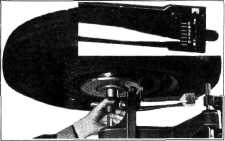
Fig. 13-Setting Indicator Pointer to "O"
pointer on the indicator hub is in contact with the leveling plate.
Now, revolve the wheel slowly by hand until the pointer on the
indicator reaches its lowest
position. Then set the scale so that the end
of the pointer reads on "0," Fig.
13.
Turn the wheel 180° (1/2 way), and read the
total number of graduations that
the pointer moves upward on
the scale. At this position (the high
point) chalk the tire directly
above the pointer, but on
the underside of the wheel. We are now
ready to attach the weights.
The amount of weight required varies according
to the size and weight of the
wheel assembly. Heavy
wheels require more weight than light
wheels. Chevrolet wheels require
about 1 ounce of weight for each graduation mark indicated on
|
|||||
|
|
|||||
|
SERVICE NEWS REFERENCE
|
|||||
|
|
|||||
|
MONTH PAGE NO.
|
SUBJECT
|
||||
|
|
|||||
|
June 1941
|
24
|
Static Electricity
in Automobiles
|
|||
|
|
|||||
|
June 1941
|
26
|
White Sidewall Tire
Cleaning
|
|||
|
|
|||||
|
September
1941
|
44
|
Static Electricity
in Automobiles
|
|||
|
|
|||||