1942 - 1947 CHEVROLET SHOP MANUAL
Section 11 - Chassis Sheet Metal
|
|
||||
|
11-2
|
||||
|
|
||||
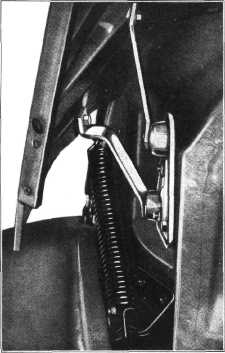 |
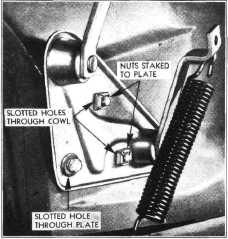
The top and rear bolt
holes through the cowl, and the front bolt hole through the hinge
plate, are elongated horizontally as well as being considerably wider
than the bolt diameters, to provide for shifting either hinge
plate in any direction necessary for proper hood adjustment and
alignment. Fig. 4. Access to the two bolts on the inside of the cowl
panel is provided for by cutouts in the cowl inner structure, Fig. 5.
Due to the length and
weight of the hood, heavy hinge springs are used for proper balance
when in the open position. The upper end of each spring is hooked
through a hole in a tab of each rear hinge arm, and the lower ends
hook over the front of horizontal brackets extending from the side of
the cowl to the fender ledge,
NOTE-Care must
be used in unhooking and hooking the hood hinge springs due to
the heavy tension.
Hood Adjustment
|
|||
|
In making hood adjustments,
attention must be paid to proper spacing and alignment. Both
front doors should be closed, and the spacing alignment checked at
the following points during adjustment:
Back end of hood on
cowl, at both front doors,
along sides where side panels join
the fender ledges, at the
front end across the top of the grille. The top
panels should rest
|
 |
|||
|
Fig. 3-Hood Hinge and Attachment to Hood
|
||||
 |
||||
|
firmly on the cowl all
across in front of the windshield.
|
||||
|
Fig. 5-Hood Hinge
Plate Belts Inside Cowl
|
||||
|
To adjust the hood for alignment and proper
spacing, proceed as follows:
1. Open
hood, disconnect both hinge springs at the
lower ends, loosen both front
hinge plate-to-cowl
bolts.
2. Loosen
the four (4) slotted head screws attaching
the hood lock plate to the top baffle-do not remove screws, and leave
this plate loose on the
screws until the hood adjustment is completed.
3. Close
hood. Working inside the car loosen two
cowl-to-hinge plate bolts on each
side.
4. Close
both front doors. Shift hood as necessary,
while in the closed
position, to arrive at proper
|
||||
|
Fig. 4-Hood Hinge Plate Attachment
|
||||
|
|
||||