1942 - 1947 CHEVROLET SHOP MANUAL
Section 11 - Chassis Sheet Metal
|
|
|||
|
11-3
|
|||
|
|
|||
|
alignment and spacing at all points outlined in
the foregoing.
5. When
proper adjustment is reached, securely
tighten the two cowl-to-hinge
plate bolts on each side
from inside the car while the rear end
of the hood is held down firmly
on the cowl.
6. Open
the hood, securely tighten the front hinge
plate to cowl bolt on each side.
Connect hood hinge springs
to cowl bracket.
7. Bring
the front end of the hood down easily and
allow the tapered end of the lock
bolt to center the hood
latch plate on the screws. Do not close
the hood at this time.
When the latch plate has become properly centered, raise the hood, and
without disturbing the centered position of the
lock plate, securely tighten the
four screws attaching it
to the top baffle.
Lock Plate Latch Control and Adjustment
The lock plate including the latch is attached
to the top baffle by four (4)
screws-the right front
screw also holding the upper end of the grille
baffle. All bolt holes through the
plate are elongated fore
and aft to allow adjustment or centering
of the lock bolt through the
latch opening, Fig. 6.
|
properly position the plate and center the latch
opening.
NOTE-If the lock
plate is not centered, and the screws are tightened with the plate
positioned all the way forward, closing the hood will cause the lock
bolt to force the latch back, catch under the plate and make it
impossible to open the hood.
HOOD ALIGNMENT WITH TOP OF
RADIATOR GRILLE
The closing or locking
tension of the lock bolt in the
lock plate may be adjusted by loosening the
lock nut on the bolt and turning
the bolt in the retaining
plate, Fig. 2, clockwise to increase the tension,
counterclockwise to reduce it. This adjustment
also changes the spacing between the underside of the hood and
top of the grille. Proper spacing at this point is Vie" which should
produce approximately 1/32"
compression of the rubber bumpers on the top baffle.
GRILLE
Removal
To remove the
grille, proceed as follows:
1. Open
hood. Disconnect hood latch cable at
swivel, loosen cable clamp just
back of lock plate, and pull the cable back through rubber
grommet in top baffle. Remove
right front hood lock plate
screw. This screw also holds the top
end of the grille baffle.
2. Remove
top baffle-3 sheet metal screws on
each side to each fender ledge,
and 4 across front into top flange of grille. Remove 2 sheet
metal bolts holding front inner
corners of fenders to
grille-in back of grille.
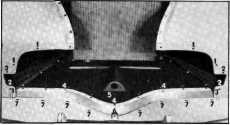
3. Remove
attaching bolts, nuts and clips as follows,
Fig. 7.
|
||
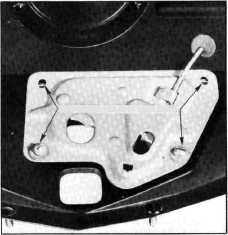
ELONGATED HOLES IN LOCK PLATE
|
|||
 |
|||
|
Fig. 4-Hood Lock Plate an Tap Baffle
In any case where the lock plate has been removed
or the attaching screws loosened, care must
be exercised in positioning the
plate before tightening
the screws. Leave the screws loose and center the
latch opening by bringing the hood
down carefully to allow
the tapered section of the lock bolt to
|
|||
|
Fig. 7-Location of Grille Attaching Bolts, Nuts
and Clips
(1) Bolts staked in grille-upper 2 nuts in back
of grille, lower 2 in back
of side baffle under
fender.
|
|||
|
|
|||