1942 - 1947 CHEVROLET SHOP MANUAL
Section 11 - Chassis Sheet Metal
|
|
|||
|
11-4
|
|||
|
|
|||
|
(2)
Parking lamp stud nuts (2 studs in each
lamp-part of lamp
body), upper 2 in back of grille, lower 2 in back of side baffle under
fender.
(3) 2 bolts, one
on each side, joining side baffle flange, fender return flange, and
angle bracket at lower outer corner of grille-in back of side baffle
under fender.
(4) 3 sheet
metal bolts holding bottom horizontal flange of vertical grille
reinforcements to lower baffle-in back of grille.
(5) 1 bolt
holding grille baffle to lower baffle-in back of grille.
(6) 1 bolt
holding bottom of grille center molding and medallion to lower
baffle-under lower baffle.
(7) 8 special
clips, 4 holding each section of plated trim molding across gravel
guard in front of grille-under gravel guard.
4. Pull
each parking lamp assembly straight forward to free studs from grille
and fender.
5. Pull
the grille straight forward out of the front
end. Due to the true fit of the
grille bolts through the
fender, and the right-angle bracket
at each lower corner of the
grille-the flanges of which
extend horizontally under the lower edge
of each fender, it may be
necessary to pry the grille loose at various points to start it out.
6. The
baffle may be removed from the grille by
removal of the bolts which attach
it to the center
reinforcement of the grille proper.
To replace grille,
reverse the foregoing operations.
NOTE-When reinstalling
the grille, be sure to have the parking lamps in front of the grille;
otherwise, it will be necessary to disconnect the wires at the
junction blocks to bring the lamps to the front for installation.
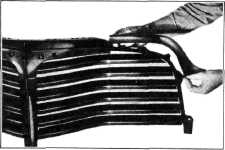
Grille Disassembly
The extent to which
the grille may be disassembled consists of removing the name plate,
center molding, and the two upper trim moldings extending outward
from each side of the name plate and down to the top of the parking
lamps.
The two upper trim
moldings may be removed by pushing upward on the end nearest the
parking lamp to free the back flange of the molding, which snaps over
the grille framing, Fig. 8.
To remove the name
plate, and center molding, remove the 2 rivets holding top return
flange of
|
 |
||
|
Fig. 8-Removing Grille Upper Molding
name plate to grille
(first rivet to right and left of center on top). Near each outer end
of the name plate, remove 2 screws, one on each side, holding name
plate bottom return flange to brackets attached to grille proper. On
back of grille remove 1 screw extending horizontally through angle
bracket and grille center reinforcement. Name plate and center molding
may now be taken off. The center molding may be removed from the name
plate by removing the 2 rivets joining these two parts at the lower
center section of the name plate.
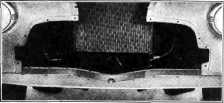
LOWER BAFFLE AND FRONT SPLASH GUARD
The front splash guard
is a part of the lower baffle, being riveted to the baffle at a point
just behind the front of the grille, Fig. 9.
|
|||
 |
|||
|
Fig. 9-Lower Front End Baffle and
Splash Guard
Sufficient space is
left between the front bumper face bar and the splash guard to permit
bumper bar deflection under heavy impact without damage to the guard.
Rubber bumpers are used on the underside of the splash guard to
prevent metal-to-metal contact or rattle on the bumper brackets.
Removal
To remove the lower
baffle and splash guard, proceed as follows:
1. Remove front
bumper assembly by removing the bracket bolts to the frame. Remove
grille.
|
|||
|
|
|||