1942 - 1947 CHEVROLET SHOP MANUAL
Section 1 Body
|
|
|||
|
1-14
|
|||
|
|
|||
|
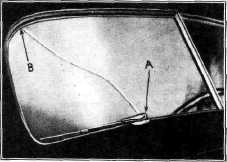
present. Examine the opening at the point
where the glass cracked (See A and
B Fig. 28) and remove, or
correct any obstruction or high
spot that may be found. It may be
necessary to peen the
windshield flange or it may be that
the weld at the upper corner of
the windshield opening is protruding too far. It is also possible
that the windshield wiper
housing cap shown at "A"
in Fig. 28 may be tightened in such a
manner that it binds on the
windshield glass. The cut-out on the top of the cowl for the
windshield wiper mechanism may
also be exerting too much
tension against the glass. The
cause, whatever it may be, of the
windshield glass cracking
should be removed before a new
glass is installed.
5. Using
FS-638 sealing compound lay a 3/16" bead
of this compound on the inside
lower edge of the pinch
weld rubber channel entirely around
the glass opening as shown in the
left-hand picture in Fig.
29.
6. Insert
the new glass into the windshield rubber
weatherstrip and work the rubber
on to the glass. Push
glass and rubber molding into the
windshield opening. Before
starting this operation,
make sure all old sealing compound is
cleaned out of the windshield
rubber weatherstrip and in
the vicinity of the lower center
division of this weatherstrip.
7. Re-install
the windshield garnish molding,
pressing firmly to position. Finish at the top and bottom
centers by replacing medallions
over center joints.
8. Set
all the garnish molding screws tight and
remove masking tape from
instrument panel.
9. On
the outside of the windshield as an added precaution, the lip of the
rubber weatherstrip
against the glass should be cemented to the glass using FS-655 rubber
cement in the B-182-A body
cement gun. Cement all around the
glass. Any excess cement should
be removed using oleum
spirits sparingly.
|
Windshield Sealing
(Fleetline and Fleetmaster Models)
On these models a rubber channel fits over the
pinch weld around the windshield
opening. This channel which
is separate from the glass channel has a center section which
laps around the center division
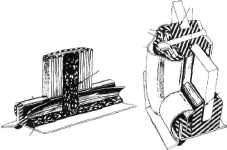
channel. The cross section in Fig. 29 shows the assembly
details. The inner side of this rubber
laps back, forming a slot for the
rear flange of the plated
windshield reveal molding.
When installing this
rubber seal, the pinch weld and
the center division channel should be coated with FS-655 rubber
cement.
The chrome-plated center division channel cap
molding must be installed before
installing the windshield.
When installing a windshield, lay a bead of FS-638
sealing compound at the intersection of the pinch weld rubber channel
and the windshield opening at the rear side; also load the full
length of
|
||
 |
|||
|
Fig. 29-Fleetmaster Windshield and Reveal
Molding Seal
the slot between the
end of the rubber on the center division channel.
Using a B-182-A body cement gun, lay a bead
of FS-655 rubber cement in the
glass groove of the
windshield rubber; then install the windshield glass
or glasses in the rubber channel.
The assembly can then be pressed into the opening.
NOTE—Should it
become necessary to remove the center division channel cap molding, it
is necessary to loosen the garnish molding first; otherwise the
molding will be damaged.
Windshield Sealing
(Stylemaster Model)
The windshield on this model, which does not
have the plated reveal moldings as
on the Fleetmaster model,
is sealed as follows: 1.
On the outside of the windshield opening, work
or straighten up the lip of the
rubber weatherstrip, so
that it lies in correct position against
the glass. It may be necessary to
loosen the
|
|||
 |
|||
|
Fig. 28-Points of Possible Obstruction in
Windshield Opening
|
|||
|
|
|||