1942 - 1947 CHEVROLET SHOP MANUAL
Section 1 Body
|
|
|||
|
1-15
|
|||
|
|
|||
|
windshield garnish molding screws temporarily to do this.
2. The
windshield side of the center division channel weatherstrip should be
coated with FS-655 rubber
cement. In tightening the screws
of this channel, start at the
center screw first, then
top and bottom—tighten to a snug fit only.
3. Using
FS-655 rubber cement in a B-182-A body
cement gun. seal between
windshield glass and
rubber around entire windshield opening.
4. Seal the
outer lip of the windshield
rubber weatherstrip which rests on the body metal around the entire
windshield opening, using FS-65.S rubber cement in the B-182-A body
cement gun, also seal under the windshield wiper housing cap gaskets.
Door Glass-Town
Sedan and Coupe Removal
1. Remove
the door window garnish molding including
the clips at lower part of window opening,
and door trim pad. Remove door inner
panel hole covers.
2. Loosen
the door division channel lower end
adjusting screw—do not remove
channel from the door.
3. With
the door glass lowered, remove the lower sash channel cam
screws and disengage the cam from
the cam support. These screws are accessible
through the holes in the door inner panel. Fig. 30.
4.
Remove the glass run
channel.
5. Raise
the glass to the closed position, tip the
glass inward at the top and lift
it out of the door.
Replacement operations are the reverse of the
foregoing.
Door Glass-Sedan
Front Door Removal
1. Remove
the door window garnish molding including
the clips, and door trim pad. Remove
door inner panel hole covers.
2. Loosen
the door division channel lower end
adjusting screw—do not remove it
or the channel.
3. With
the glass up, almost to the closed position,
tip it inward at the top to
disengage the cam from the
sash channel. Lift the glass out of the
door.
Replacement
operations are the reverse of the
foregoing.
Door Glass-Sedan
Rear Door Removal
1. Remove the door window garnish molding and
clips at lower part of window
opening. Remove
|
door trim pad and
door inner panel hole covers.
2. With the window
down, remove the screws from each
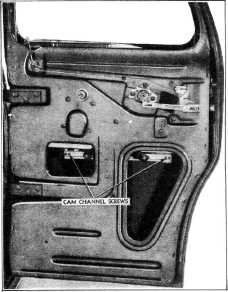
end of the cam channel, Fig. 30.
|
||
 |
|||
|
Fig. 30-Door Glass Cam Channel Screws
3. Push
in on the bottom of the glass channel until
it is free of the cam channel.
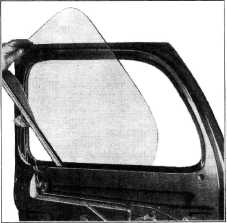
4. Tip
the glass up on one end and lift out of the
door window opening. Fig. 31.
|
|||
 |
|||
|
Fig. 31-Removing Sedan Rear Door Glass
|
|||
|
|
|||