1942 - 1947 CHEVROLET SHOP MANUAL
Section 1 Body
|
|
|||
|
1-18 |
|||
|
|
|||
|
4. Using the window regulator,
turn window to the closed position. Take hold of the glass and shift to
the rear slightly to disengage from regulator, then move the glass
toward the front of the opening. Glass will now be free and may be lifted
out of the opening.
Replacement operations are the
reverse of the foregoing.
Town Sedan Quarter Gloss
Regulator Removal
1. Remove the rear seat cushion and seat
back cushion.
2. Remove the rear quarter garnish molding.
Lower the glass and remove the
glass run channel.
3. Remove the regulator handle and quarter
trim. Raise the glass and remove
the screws attaching the cam
channel to the sash channel and remove the glass.
4. Slide the cam channel off the cams on the
regulator and remove the
channel. Remove the screws
attaching the regulator and its cover to the inner panel, Fig. 34, then thread the
regulator out of the inner
panel.
When replacing the regulator, thread the regulator arms in through the opening
in the inner panel. Install the regulator cover and seal with FS-638
sealing compound. Install retaining screws, then slip the cam channel over the cams on the
regulator. All other installation operations are just the
reverse of the foregoing.
DOOR OPENING
WINDLACE
The round trim covered
weatherstrip all around the inner edge
of the body door openings
is a one-piece weatherstrip known as windlace. This windlace serves
as an additional protection against wind and drafts entering the body
around the doors.
Fig. 37-Door Opening
Windlace
The edge of this
wind-
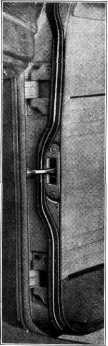 |
lace is tacked to the tacking
strip at all points around the inner edge of the door openings, and the
lower ends are held by the door sill molding, with exception of that
section on the front body hinge pillar. On this pillar the metal flange of
the windlace is attached by screws to the inner edge of the pillar, as
shown in Fig. 37.
To remove or replace the windlace
around the front door, remove the windshield garnish molding on the side
involved, remove the cowl trim pad to expose the screws attaching the
windlace metal flange to the pillar. Remove the windlace flange screws,
including one screw through a tab at the lower face of the pillar, loosen
the trim on the inner surface of the body lock pillar and over the door
opening, and remove the door sill molding. Loosening the trim as
outlined exposes the tacks holding the windlace to the body tacking
strip.
On rear door openings, to remove
or replace the windlace, it is necessary to loosen the trim on the inner
face of the body hinge and lock pillars, over the door opening, and the
front edge of the rear quarter trim pad, to expose the windlace tacks to
the body tacking strip. Remove the door sill molding.
COWL VENTILATOR
Removal
1. Working under the instrument panel, remove
the bolt attaching the cowl
ventilator control arm to the ventilator cover operating arm.
Remove the ventilator cover
hinge bracket bolts to the cowl hinges.
2. Remove the ventilator cover from the
outside by shifting it to the
right in the opening to free the right end, then to the left to free the
left end.
Replacement operations are the
reverse of the foregoing. However, it is necessary that one person hold
the ventilator cover firmly in the closed position while another
installs and tightens the cover hinge bracket bolts to the hinges. (Cover
hinge bracket bolt holes are slotted.)
It is also necessary that the
ventilator cover be fully closed and the control handle be backed down to
the first notch while assembling the bolt holding the control arm to the
operating arm.
Cowl Ventilator Gasket
This rubber gasket or seal is
securely cemented into the channel around the cowl ventilator opening in
the cowl panel, and the bottom flange of the ventilator cover seats
and seals on it to prevent water leaks.
In replacing this gasket, after
removing the old gasket, carefully clean the channel. Remove all hardened
cement, and sandpaper out any traces of rust. Make sure the drain is
open.
Cover the entire surface of the
channel with |
||
|
|
|||