1942 - 1947 CHEVROLET SHOP MANUAL
Section 1 Body
|
|
|||
|
1-19
|
|||
|
|
|||
|
FS-655 rubber cement, allow cement to dry for
four or five minutes, then
assemble the new rubber
gasket and press it down into the channel all
around. Be sure the gasket surface
against which the cover
seals, and the sealing surface of the cover,
are clean and absolutely free of
any traces of cement, oil
or any substance which might cause the cover to stick to the gasket.
BODY ENTRANCE
STEPS AND STEP MATS
Concealed body entrance steps, covered with rubber step mats, are
located at the outer edge of the
body floor at each door opening.
Starting at a point just forward of the center
outer edge of each front step, a
detachable plate is used to
carry the body sill line and sill molding
outward and forward to conform
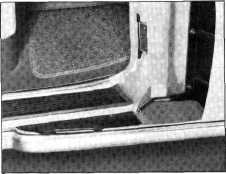
with the contour of the front fender cap on each front door. Fig 38.
|
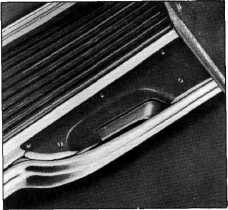
A recess at the outer edge of this plate, in line
with the front part of the door
opening, serves as a
convenient foot scraper. Fig. 39.
This detachable plate also provides a means of
reaching the front fender cap
bolts to the front door panel, to permit any necessary
alignment adjustment of these caps
with the front fender.
Step Plate Removal
1. Release
the body sill molding from the front
end of the front fender skirt
back to a point in line with the rear of the front door opening.
2. Remove
the bolts extending horizontally
through the step plate into the
body floor, and the bolt at
the front outer edge of the step to
the front fender skirt. These
bolts are accessible after
releasing the sill molding.
3. Remove
the three screws along the inner edge
of the foot scraper trim plate to
the body floor. The step
plate is now free and may be removed.
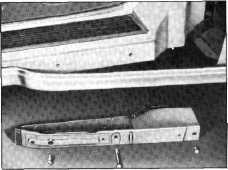
With this plate removed. Fig. 40, and the front
door closed, all bolts attaching
the front fender cap to
the door may be reached through this opening from the
underside of the car.
|
||
 |
|||
 |
|||
|
Fig. 38-Detachable Front Step Plate
|
|||
 |
|||
|
Fig. 40-Front Step Plate Removed
Step plate replacement operations are the reverse
of the foregoing.
Step Mat Removal
1. Remove
the two slotted head screws holding the
center section of the mat to the
step. Three screws are
used on some passenger cars having
longer steps such as on the
Areosedan.
2. Using
a putty knife or wide blade screwdriver
along the inner edge of the mat at
the door sill plate, pry
this inner edge straight up from the
step. When this edge is up
sufficiently, use one hand
to pull upward along this edge while
pushing the outer edge of the mat
straight in horizontally
toward the body, to free the
catches on the underside of the
mat along the outer edge,
Fig. 41.
|
|||
|
Fig. 39-Foot Scraper in Front Step Plate
|
|||
|
|
|||