1942 - 1947 CHEVROLET SHOP MANUAL
Section 1 Body
|
|
||||||
|
1-31
|
||||||
|
|
||||||
 |
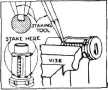
Seventh-Stake the
retainer securely in place. The
retainer is held in place
by staking the cylinder metal over both
edges of the retainer
ends from the outside,
using the staking tool (or
screwdriver), Fig. 64. Hold the staking tool
at right angle to the top
of the retainer. Form the
Cast metal of the cylinder over
the retainer with a single
|
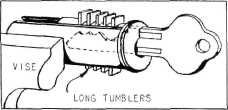
2. Press the cylinder into the filing fixture with
the notched side of the key up,
and the long tumblers in the slot. Fig. 66.
|
||||
 |
||||||
|
Fig. 63-Installing
Tumbler Spring Retainer
|
||||||
|
3
|
Fig. 66-Lock Filing Fixture-Key Notches Up
|
|||||
|
stroke of a light hammer for each of the four staking
positions, Fig. 64.
|
||||||
|
|
||||||
|
Hold the filing
fixture in the vise and file the
tumblers flush with the edge of the fixture. Use
a standard 5/8" double cut File
for this operation, and finish filing using a flat 5-1/4" No.
2 Needle Equalling File.
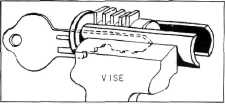
4. Remove the cylinder and insert it in the opposite
side of the fixture with notched side of the key down, Fig. 67. File
the tumblers flush with
the edge of the fixture.
|
||||||
 |
NOTE-lf the
tumblers have been incorrectly assembled and not according to the
code, the tumblers can be removed -from the cylinder
by holding it with the tumbler slots down, pulling the
bar
|
|||||
|
|
||||||
|
|
||||||
|
Fig. 64-Staking Spring
Retainer in Place
|
out with the
fingers
|
 |
||||
|
and jarring the
cylinder to shake the tumblers out. This procedure is necessary
because after the tumblers have been pressed down into the cylinder as
shown En Fig. 61, they are held in their slots by the bar.
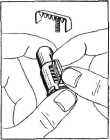
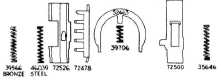
How to Code Five
Tumbler Single Bitted Lock
To file the tumblers of an uncoded five wafer
tumbler single bitted lock
Cylinder, as used in the
glove compartment and trunk lid locks, Fig. 65, to fit a
certain key number, proceed as follows:
1. Insert key in the uncoded cylinder.
|
||||||
|
Fig. 67-Lock Filing Fixture-Key Notches Down
5. Using the fixture as a test gauge, remove from
vise and if the tumblers are filed
correctly, the cylinder will turn in the fixture.
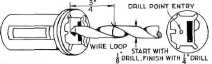
Removing Locks by Drilling
In case of necessity, a side-bar lock may be
drilled out to remove, according
to the following procedure:
Use screwdriver and pliers to remove the dust
cover and brass face cap before
drilling. To avoid damaging
any parts other than the lock cylinder,
and to govern the correct depth
to drill, twist a
|
||||||
 |
||||||
|
|
||||||
|
FOR SINGLE BITTED
RIBBED TUMBLER LOCK
Identified By Offset
Key
Hole
|
SINGLE
BITTED
UNCODED
TUMBLER
|
 |
||||
|
|
||||||
|
Fig. 65-Five Tumbler Lock Parts
|
Fig. 68-Drilling to Remove Side-Bar Leek
|
|||||
|
|
||||||