1942 - 1947 CHEVROLET SHOP MANUAL
Section 3 - Front Suspension, Axle & Springs
|
|
|||
|
3-18 |
|||
|
|
|||
|
Changing
caster with the use of correcting tools is an operation of leveling the spring
seats in those cases when the
use of caster shims is not advisable. Figure 40 shows the proper installation of
the tools for decreasing the
caster on the right side or
for increasing caster on the left side. To increase caster on the right side or to
decrease caster on the left
side, connect the toggle link to the lower part of the jack on the right
hand side of the jack. In
other words, the tool installation will be made as shown to either increase or
decrease caster, the setup
being made at the front of the I-beam to decrease and at rear of the I-beam
to increase caster. As there is a certain amount of "spring" in the I-beam, the valve on the
jack should be released before
checking the correction with the caster gauge.
RELATION BETWEEN CAMBER AND
KING-PIN INCLINATION
From the
definitions of Kingpin Inclination and Camber—one being the inward tilt of
the kingpins and the other the outward
tilt of the wheels—it is evident that one can not be corrected with
the use of correcting tools
without changing the other. For this reason these two factors of front
end alignment must be considered together.
CAMBER AND KINGPIN INCLINATION
CORRECTION
The ONLY
instance in which a camber correction may be made at the I-beam, is where
BOTH camber and kingpin inclination are off
by |
If a check
shows that the camber is out but the kingpin inclination is all right, it
indicates a bent wheel spindle which will have to be
replaced.
STRAIGHTENING FRONT AXLE "I"
BEAM
When it is
necessary to straighten the front axle "I" beam out of the truck the gauge
illustrated in Fig. 42, should be
used. The gauge consists of two pins that fit in the kingpin holes. These
pins are tapered so that they
properly fit and center in the
axle.
The first
operation in straightening "I" beams, is to properly level the spring seats
either on an arbor press or
with a bending bar. Assemble the kingpin pins into the holes in the end of
the beam. Place a cord on each
pin and slide a square on the spring seat until it touches the cord. Check
from the square to center of the spring tie bolt hole. When the axle is in
proper alignment the kingpin |
||
 |
|||
|
Fig. 42—Front Axle "I" Beam Gauge
holes and
the hole for the spring tie bolt holes in the spring seats, are all in
line.
Place the
gauge on the spring seats and check the angle of the pins against the face of
the gauge. When the kingpin
angle is correct, the pins will be parallel with the face of the
gauge.
CAUTION-Do not heat Chevrolet
front axle "I" beams to straighten. Straighten them cold-heating will
change the metal strength.
HOW TO REMOVE FRONT WHEELS
Lift the
wheel from the ground with a jack under the front axle "I" beam. Remove hub
cap, and hub grease cap. Pull
out cotter pin locking the spindle nut. Remove the spindle nut and
spindle washer. Remove front
wheel.
The outer
cone and balls and the inner cone are loose and may be easily removed. The
inner balls may be removed by prying
out the inner bearing felt
retainer. If this is done, a new felt retainer assembly should be used when reassembling,
The ball cups are pressed into
the hubs and can be |
|||
 |
|||
|
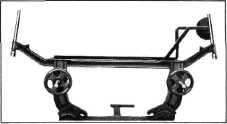
Pig. 41—Correcting Camber and Kingpin
Inclination
the SAME
amount. Then a correction at the I-beam will take care of both conditions at
the same time. Figure 41 shows
the installation of the correcting tools for this
operation.
If a check
shows that both camber and kingpin inclination are out, but NOT by the same
amount, it means not only that
the wheel spindle is bent and will have to be replaced, but also
that a correction will have to be made at the I-beam to correct the kingpin inclination. The same
thing is true if the camber is
all right and the kingpin inclination is out. |
|||
|
|
|||