1942 - 1947 CHEVROLET SHOP MANUAL
Section 6 - Engine
|
|
|||
|
6-4 |
|||
|
|
|||
|
piston pin. The cylinder should be
bored to the same diameter as the piston.
If a micrometer is not available
to measure the piston, the cylinder should be bored .002" less than the
oversize piston to be fitted. For example, when fitting a .020" oversize
piston, the cylinder should be bored .018" oversize.
Cylinder Hone
After the cylinder bores have been
rebored within .002" of the size desired, they should be finished or
polished with a hone, similar to the one shown in Fig.
3. |
operation kerosene should be used
as a cutting fluid to keep the stones of the hone clean. This same
procedure should be followed until the piston being fitted can be pushed
through the cylinder on a .002" feeler, using a light pressure, and will
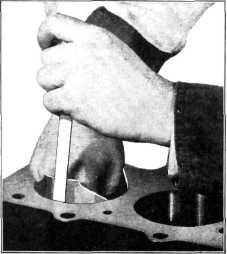
lock on a .003" feeler. THE FEELER GAUGE MUST BE PLACED BETWEEN THE PISTON
AND CYLINDER WALL ONE-QUARTER OF THE
WAY AROUND FROM THE PISTON PIN ENDS, OR AT RIGHT ANGLES TO THE
PISTON PIN, Fig. 4.
CAUTION—Greater care must be
exercised when fitting the slipper skirt pistons because they can be
damaged by careless handling.
Do not exert heavy pressure on the
piston when pushing it into the cylinder bore to check the fit with a
feeler gauge.
Fitting Piston Pins
Chevrolet pistons are sold with
the piston pin bushings and piston pins fitted in them. Very seldom
will it be found necessary to replace the piston pins due to the bushing
becoming excessively worn, but should this operation become
necessary, the following procedure should be carefully
followed:— |
||
 |
|||
|
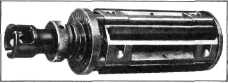
Fig. 3—Cylinder Hone
This is an expanding type hone,
with the blades or stones expanding when the nut on the top of the hone is
turned.
In operation, the hone is placed
into the cylinder bore and expanded until it can just be turned by
hand. The hone is then operated up and down and rotated clockwise in the
bore until it begins to run free. Then the expanding nut, on the top of
the hone, is tightened and the hone again operated in the bore until
it runs free. During this |
|||
 |
|||
 |
|||
|
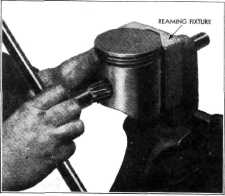
Fig. 5—Reaming Piston Pin Sinkings
1. Place the piston pin bushing reaming
fixture in a bench
vise.
2. Adjust the expansion reamer for a light
cut.
3. Insert the reamer in the piston bushings
and start the reamer pilot
into the guide in the fixture.
4. Hold the piston in the V-block of the
fixture with one hand and turn
the reamer handle with the
other hand until the reamer has passed through both bushings as shown in
Fig. 5. |
|||
|
Fig. 4— Fitting Pistons |
|||
|
|
|||