1942 - 1947 CHEVROLET SHOP MANUAL
Section 6 - Engine
|
|
|||||
|
6-46 |
|||||
|
|
|||||
|
cover next to the tapped passage
marked "INT."
4. Install the valve retainer with the convex
side up, install the two
retainer screws,
5. Assemble the top cover assembly to the fuel
pump body and tighten the
cover screws alternately
and securely.
6. Assemble the screen on the cover and
assemble the glass filter bowl
to the cover, making sure the
cork gasket is in good condition and that the bowl nut is tight to prevent air leaks
at this point.
AIR CLEANER AND INTAKE
SILENCER
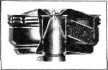
The air
taken into the carburetor, to mix with the fuel, is thoroughly cleaned in passing
through the combined air
cleaner and flame arrester mounted on the top of the carburetor at the
air intake, Fig.
97. |
clean
gasoline, and let it drain dry. The element should now be dipped in new engine oil and
again drained dry, then install the cover and felt pad on the air
cleaner.
Under
extreme conditions where the car or truck is operating on gravel or dusty roads,
the filter element must be
cleaned at more frequent intervals than mentioned
above.
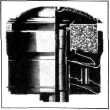
For service
and special equipment, a heavy-duty,
oil bath type air cleaner is available for use
on passenger cars
with- |
||||
 |
out a governor, and on trucks with or without a governor. A
cross-section of this air
cleaner is shown in Fig. 98.
The oil bath air cleaner
|
||||
|
used on passenger
cars |
|||||
|
Fig. 99—Oil Bath Air Cleaner
(Passenger Car with Governor) |
equipped with a
gover- |
||||
|
nor is
shown in Fig. 99.
This heavy
duty air cleaner is quickly interchanged with the air cleaner used as
standard equipment and will not affect
the power and economy in
any way. Oil of not less than S.A.E. 50 viscosity MUST be used in summer and
lighter grades in the winter
and the level must be maintained. One pint of oil will fill the
cleaner to its proper
level.
Servicing of this air cleaner is
an important operation and must
be performed as follows:
Remove the
air cleaner from the carburetor. Remove the wing nut from the top, remove the
cover. Remove the filter element assembly.
CAUTION—Do not pry
this part loose if it sticks.
It must be removed by hand, otherwise damage to the filter element flange may
result. This flange
must lie flat against the body to insure a tight seat at this point to
prevent air leaks when
the cover is assembled.
Empty the
oil out of the cleaner and clean out all oil and accumulated dirt. Wash body with
clean gasoline and wipe dry.
Wash filter element by slushing
up and down in clean gasoline. Dry thoroughly, either with an air hose or by
allowing it to stand until
dry. Fill the body of the cleaner with one pint of oil of the proper
viscosity.
It is not
necessary to re-oil the filter element. This is done automatically when the car is
driven.
Reassemble
the filter element to the body of the cleaner, being sure that the flange rests
flat against the top flange of
the body. Reassemble the cover, making sure the gasket is clean and
in good condition over its entire
surface so a tight seat is obtained at this point. Install wing
nut. |
|||||
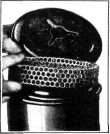 |
Cleaning of the air is accomplished by a pad of woven
copper gauze, (filter element) through
which the incoming air passes, depositing all particles of dust, dirt and grit on its oil covered
edges. The metallic gauze pad also quenches any flame that may be caused by
backfire |
||||
|
Fig. 97—Passenger Car Air Cleaner |
through the
carburetor. |
||||
|
Under
ordinary conditions, where the
car or truck is driven on pavement or surfaced roads, the filter element
of the air cleaner should be
cleaned every 2,000 miles. On
passenger cars it is not necessary to remove the air cleaner from the carburetor to
clean it. as this element may
be removed after the cover is taken from the air cleaner. To clean the
element, rinse thoroughly in clean gasoline and then let it drain dry.
Then dip it in new engine oil, again
drain it;
then reassem- |
|||||
 |
ble the
element and cover to the air
cleaner.
To clean the filter element on the truck air cleaner, it is necessary to remove
the air cleaner from the
carburetor. Then remove the
top cover and felt pad from |
||||
|
the air cleaner, wash the copper filter element
in |
|||||
|
Fig. 98-Heavy-Duty Oil Both Air
Cleaner |
|||||
|
|
|||||