1942 - 1947 CHEVROLET SHOP MANUAL
Section 7 - Transmission
|
|
|||
|
7-3 |
|||
|
|
|||
|
the two guide pins during this
operation will support the
transmission and prevent damage to the clutch disc through
springing.
14. Remove the transmission
through the opening in the body floor.
Replacement
of the transmission is just the reverse of the foregoing
operations.
REMOVAL OF TRANSMISSION FROM
CHASSIS (Cabriolet)
Due to a difference in design
between the Cabriolet frame and
that of other passenger car models, the operation of removal and
replacement of the transmission
varies slightly. The following instructions cover the removal of the
Cabriolet transmission:
1. Remove the floor mat and the cover over the
transmission from the body
floor.
2. Working from underneath the car, remove the
two bolts that fasten the two
halves of the reactionary lever
metal boot together, then remove the outer half of the
boot.
3. Remove the cotter pin from the transmission
end of the selector rod and disconnect the rod from the selector lever. Remove the cotter
pin, washer and anti-rattle
spring from the transmission end of the gearshift control rod
and disconnect the
rod.
4. Disconnect the vacuum cylinder piston rod
and valve link from the
reactionary levers.
NOTE—Replace the clevis pin
through the piston rod yoke and valve link to prevent upsetting the vacuum
valve adjustment.
5. Remove the vacuum cylinder from its
mounting bracket. Then
follow instructions for regular passenger car transmission removal
contained in Paragraphs 6
through 12, then:
6. Slide the
transmission back until the clutch gear shaft is just free of the splines
in the clutch disc, then raise the back end of the transmission enough to remove the transmission rear
mounting. When the
mounting is free of the transmission, shift it forward and remove
through the opening in the
frame.
7. Move the transmission back and rotate it to
the left as necessary to
provide clearance in bringing
it up through the floor board opening.
Replacement of the
Cabriolet transmission is just the
reverse of the foregoing operations. |
DISASSEMBLY OF THE TRANSMISSION
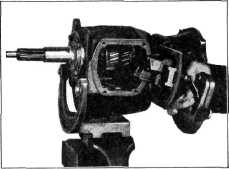
1. Mount the transmission in the
transmission holding fixture J-934,
Fig. 2. |
||
 |
|||
|
Fig. 2—Transmission in Holding Fixture
2. Remove the four capscrews which fasten the
shifter cover to the left side
of the transmission.
Remove the cover and shifter assembly.
3. Place the transmission in two gears at once
to lock the mainshaft, and remove the universal joint front yoke retaining capscrew
and lockwasher. Slide the yoke
and spacer off the
mainshaft.
CAUTION—Care should be used
when shifting the gears into second or third to prevent damage
to the wedge angles. |
|||
 |
|||
|
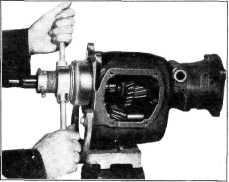
Kg. 3 —Removing Clutch Gear and Scaring
4. Remove
the four clutch gear bearing retainer screws and shakeproof lockwashers. Remove
the retainer. Note that the
screw-holes in the |
|||
|
|
|||