1942 - 1947 CHEVROLET SHOP MANUAL
Section 9 - Steering Gear Assembly
|
|
|||
|
9-10 |
|||
|
|
|||
|
3. Place a
pan under the assembly to catch the lubricant and remove the bolts attaching the
side cover to the
housing. |
dropped out
of the nut into a clean pan. With the balls removed the nut can be pulled
endwise off the
worm.
Inspection
Wash all parts in clean gasoline
or other cleaning fluid. Dry them
thoroughly with clean rags. With a magnifying glass, inspect the roller
bearing cones, worm and nut
grooves and the surfaces of all balls for signs of indentation. Also check
for any signs of chipping or breakdown of the
surfaces.
Any parts
which show signs of damage should be
replaced. Balls must be replaced with Genuine Chevrolet Parts made
according to special specifications for this steering gear. No
non-genuine balls should be
used regardless of grade or quality.
Inspect
the sector shaft for wear and check the fit of the shaft in the housing
bushings. |
||
 |
|||
|
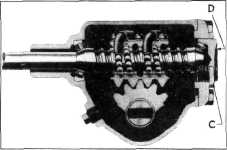
Fig. 19—Worm Bearing Adjustment Points
4. Pull the side cover, with the sector and
shaft, from the
housing.
NOTE—If the sector does not
clear the opening in the housing easily, turn the wormshaft by hand
until the sector will pass through the opening in the
housing.
5. Place the housing in a bench vice and remove
the lower end cover and lower
worm bearing.
NOTE—Do not clamp the housing
too tightly in the vice as damage may result from excessive
pressure.
6. Draw the wormshaft and nut assembly from
the housing. Lay this assembly flat on the bench so that the nut will not thread off
either end of the worm. Damage
will be done to the ends of
the ball guides if the nut is allowed to rotate until stopped at the end of the
worm.
7. Remove the lock nut from the lash adjuster
and unscrew the lash adjuster
from the side cover. Slide the
lash adjuster out of the slot in the end of the sector
shaft.
Disassembly of Ball Bearing Nut
As a rule,
disassembly of the ball bearing nut will not be necessary—if it is perfectly
free with no indication of
"binding" or tightness when rotated on the worm. However, if there
is any indication of "binding" or
tightness, the unit should be disassembled and
inspected.
1. Remove the screws and clamp retaining the
ball guides in the nut. Draw
the guides out of the
nut.
2. Turn the nut upside down and rotate the
wormshaft back and forth
until all the balls have |
|||
 |
|||
|
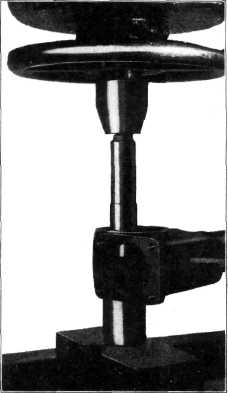
Fig. 20— Replacing Sector Shaft
Bushings |
|||
|
|
|||