1942 - 1947 CHEVROLET SHOP MANUAL
Section 1 Body
|
|
|||
|
1-6
|
|||
|
|
|||
|
ing the center
portion of the weatherstrip to
the flange while
positioning the balance.
6. At
the contour of the door belt line, and at the
molded lower corners, the best
fit can be obtained by
making a fullness by forming the
weatherstrip in a curve in the
opposite direction to the
shape of the door flange.
7. After
the weatherstrip is completely assembled,
it should be firmly rolled in
place, being careful during
this operation that the weatherstrip does
not move out of position. Remove
the clamps during this
operation. Immediately following
the rolling operation, reassemble
the clamps and blocks of
wood and allow them to hold the
weatherstrips in position for
about one hour-following
this, remove all clamps, etc., and give the weatherstrip a final
rolling.
8. IMPORTANT-If
clamps and blocks of wood
are not used as outlined in the foregoing, do not
close the door! One of the chief
causes of weatherstrips
loosening, after cementing in
place, is closing the door too
soon. When this is done
the pressure of the door against the lip
of the weatherstrip and adjacent
door opening metal causes
the weatherstrip to gradually pull
away from its cemented base
before the cement is
thoroughly dry. Doors should not be closed
tightly after weatherstrip
installation until at
least half an hour or more time, if possible, has
elapsed.
9. Thoroughly
clean every part of the door opening
surface against which the weatherstrip will seal, and as an additional
precaution against sticking
to the door opening, a coating of talc
or soapstone on the sealing
surface of the weatherstrip
will be found very helpful.
Whenever a door weatherstrip or any part of it
pulls loose from a door flange,
just re-cementing it in place is not definite assurance that it will
remain there.
The complete piece of weatherstrip involved should be removed from the
door, and the door flange should
be thoroughly cleaned—sand off all
rust spots and be absolutely sure
there is no evidence of
grease, dirt, rubbing compound or dampness on the metal before
the cement is applied.
If the same piece of
weatherstrip is to be reinstalled,
the surface to which the cement will be
applied should be thoroughly
cleaned as outlined under
"Weatherstrip Replacement."
Should it became necessary, additional clips and
attaching screws, of the same type
used in production along the bottom of the doors, may be secured
and attached at additional
places to hold the weatherstrip in place.
|
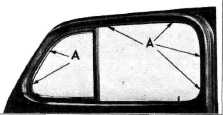
Door Window Garnish Molding
The door window
garnish molding is held in the window opening by screws at "A," Fig
11, installed through the garnish
molding at each side and at
the top, and by clips at the
lower part of the window opening.
|
||
 |
|||
|
Fig. 11-Position
of Door Garnish Molding Screws
Removal
1. Remove
the garnish molding screws, and door
lock remote control button.
2. Loosen
the molding at the top by pressing inward.
Bring the top of the molding straight
inward toward the inside of the
door and off the clips at
the bottom.
Installation
1. Hook
the lower edge of the molding over the
clips at the lower part of the
window opening, then, push
the molding into position along the
sides and at the top.
2.
Install garnish molding screws,
install door lock remote
control button.
DOOR TRIM PAD
Removal
1.
Remove the door window
garnish molding.
2. Remove
door lock remote control handle, both
regulator handles, and the two
screws located at the
bottom corners of the trim pad. Remove
the arm rest from the door by
removing the two screws
from the under side.
3. Insert
a flat tool between the trim pad and door
inner panel, separating the pad
from the panel about 1/4"
all the way around the door, then separate it approximately
1/2", etc., until the corrugated
nails are entirely loose from the door
inner panel.
This procedure
prevents the nails being pulled
away from the nail retainer in the trim pad and
will also prevent the slotted
holes in the door inner panel from being enlarged.
4. Lift
the trim pad up to disengage it from the
retainer at the bottom of the
door, Fig. 12, and from
the hooks on the door inner panel, Fig. 13.
|
|||
|
|
|||