1942 - 1947 CHEVROLET SHOP MANUAL
Section 1 Body
|
|
|||
|
1-7
|
|||
|
|
|||
 |
garnish molding and the door lock remote control
button.
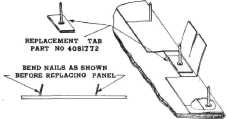
NOTE-In the event a
corrugated nail breaks away from the retainer or binding strip of the
door trim pad, the nail may be replaced by turning back the edge of
the trim material at the point where the nail is broken off or pulled
out, and inserting a replacement tab. Fig. 14, which includes a new
nail welded to it.
|
||
|
|
|||
|
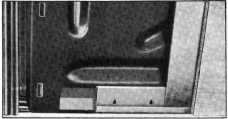
Fig. 12-Trlm Pad Retainer
Installation
1. Straighten
the corrugated nails in the trim pad
so they will properly engage the
slots in the door inner
panel.
2. Bend
the trim pad hooks on the door inner
panel to a position just above
straight out, Fig. 13.
(One hook only on sedan rear doors.) Align
the trim pad with the door, slip
the retainer at the bottom
of the pad over the retainer at the
bottom of the door, Fig. 12. Push
the trim pad against the
door inner panel, lining up the slots
in the pad with the hooks, which
can be left through the
pad, then, bend the hooks upward
against the panel.
|
 |
||
|
Fig. 14-Door Trim Pad Replacement Tab
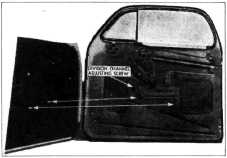
Front Door Division Channel
The division channel
on the front doors is a one-piece
vertical channel anchored at the top of the window opening by
two screws which pass through the upper window frame, Fig. 15. It is
also attached by screws at the lower part of the window opening
and at the bottom of the channel
to the inner door framework
by an adjusting screw.
One side of this channel contains the front vertical
run channel for the door glass. The front side contains the vertical
rubber molding against which the ventilator glass seals when in
the closed position.
Removal
1.
Remove the door window
garnish molding.
2. Remove
door lock remote control handle, both
regulator handles, the arm rest
and trim pad.
3. Remove
the two screws attaching the upper end
of the channel to the window
upper frame under the run
channel. Fig. 15. Remove the two screws
at the channel bracket at lower
part of window opening.
Remove the nut from the lower end
adjusting screw, push the end of
the division channel into
the door toward the outer panel
and remove the adjusting screw
from the channel. The division channel may now be removed
by pulling it up through the
window opening.
Installation
1. Thread the division channel down in between
the edge of the door glass and
the ventilator mounting.
Screw the adjusting screw into the
lower end of the channel. Press
the top end of the channel against the door header and lip of
the ventilator weatherstrip and install the two
|
|||
 |
|||
|
Fig. 13-Door Trim Pad and Door Inner Panel
3. Using
a rubber or smooth wood mallet, drive
all corrugated nails into the
slots in the sides of the
door inner panel. Using a hammer and
smooth wooden block against the
bottom of the trim pad,
firmly clinch the retainer against the
inner panel.
CAUTION-AII nails
should be driven in a little at a time until they are all driven home
evenly in order to insure even installation of the trim pad against
the door panel.
4.
Install the two screws, one at
each lower corner of the
trim pad.
5.
Install both regulator handles,
door lock remote control handle, and the arm rest. Install the
|
|||
|
|
|||